Lightwave UV Maps for UV Mapper Users - Lesson 4

This is the second page of this tutorial. If you haven't finished the first page, you can find it here.

Once again, if you click on any of the pictures, you'll get a full size screen shot.

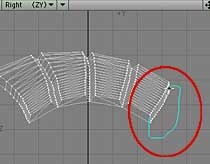
To follow along for Padding_Strips, select the row of points to the far right in a Right view. OK. Next is the Padding_Strips surface.

Now, these strips are going to have knotwork on them in the texture that I have made; but you may want to make other textures, with other designs. In order to make it as easy as possible to do that, we are going to put in some work now to save tons of work later.

We are going to line up all these points nice and straight.

(If you don't care to use my texture, and you are sure that you won't ever need any kind of ornamentation on the strips, you can skip this part, and just map them the way they are, or use a procedural texture that doesn't need a map. Do read it through, though, so you know how to do it if you do ever decide to line up points like this. If you do decide to skip it, I would recommend rotating the model again so that the surface is square along one axis. You might also want to unbend the strips, so that they are completely square in the map.)

There are far too many points here to do all the work by hand, so we are going to use Lightwave to line them up for us. (Alright, it's still going to be some work, and it's pretty tedious; but not as bad as tweaking them by hand.)

In a side view, select the line of points along the bottom of the straightest long edge of the Padding_Strips Surface. (They'll be on the top in a Top view, or on the right in a Right view.)
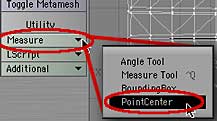
Go to Construct > Utility > Measure > PointCenter to find the average Z axis value for the row. Go to Construct > Utility > Measure > PointCenter. Depending on how you have your alerts set up, you will either get a dialog box, or the alert strip in the bottom will light up, giving you the average of the row of points on the X,Y, and Z axis.

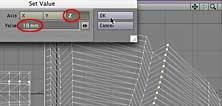
Write down the number for the Z axis, 30 mm, for me. (I keep a whiteboard next to my computer to write down all these temporary notes. It saves a ton of paper.) Feel free to round to the nearest whole mm.

With the points still selected, hit Control+V/ctrl+V to open the Set Value requester, and place that number in the value for the Z axis. All the points will be aligned, just like that.

Select the next row, and Set Value for 2 mm less than the previous row. Select the next row. Use the Set Value requester again (it's Detail > Points > Set Value if you don't like keyboard shortcuts,) and subtract 2 mm from the value that is already there. (I got this offset from taking the average distance between the points on the bottom and top of the "groove" for one of the middle rows.)
For the next row, use a 10 mm offset, since you are making a wide "strip." Continue for the rest of the surface, using 2 mm for grooves, and 10 mm for strips. Select the next row, and use an offset of 10 mm (the average distance between the two sides of the strip.)

Continue in this way, using 2 mm between the rows for "groove" points, and 10 mm between the rows for "strip" points.

Offset the rows in the other direction, using 10 mm between each, and 2 mm for the ends. When you are finished with all the rows, align the points perpendicular to the X axis, using the same offsets, for simplicity's sake. (It might be easier to take the ones closest to the Zero point to zero, and then offset in both directions from there.)

All of these will be offset 10 mm except for the ones at the very ends, of course.

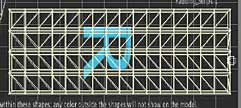
When all the points are lined up, Make UVs and position as usual. When they are all squared up, in both directions, Make UVs, using Planar, Y.

Resize, and place as usual. You will have a very neat grid, which means that any little greeblie things you want to use for decoration will automatically scale themselves to fit on the strips. Which, I think, is well worth the extra work this took!

For the easiest (but less exact) rivet mapping, manipulate each row until it's square to an axis, and make UVs for that row. Finally, we come to the rivets. How you map them really depends on what you will want to do with the image texture.

If you don't ever want to put any kind of designs on them, you can simply leave them unmapped, or map them just the way they stand and use a solid color on the image.

If you want to have some variation, but don't think it will matter much if they need flipping, or if the image on the rivets is skewed, you have to do a bit more work, but not much.

If that's your choice, you'll need to map the rivets from several different axes. To make things as easy as possible, choose the material, and then hide everything else by tapping the = key.

Rotate each group of rivets on your model so they are in the optimum position, and then Make UVs. You will find that this is really easy to do, since you can see the rotation as you apply it. Feel free to unbend the rows of rivets on the padding strips. Once the UVs are made, shrink and drag them into position on the image.

For best mapping, but identical rivets; align on all three axes, Make UVs, and allow them to pile up on the map. When all are mapped, select, resize, and position them all as a unit. If you want the best possible mapping on each rivet, and you want exactly the same design, in the same orientation, on each one, there is more work involved.

Select each one, tap Shift+A to center the selection, and use the Rotate tool (y) to align it with all three axes, making sure the top is up.

As you finish each one, Make UVs; but just leave the polys on the map where they are.

When all the UVs have been made, select the Rivets surface, which will select all the UVs, and resize them to fit the image. (If you are using the image I've made, you can resize them as explained in the next section, and drag them onto one of the rivet circles. (Of course, if you want to make your own image, you could make the rivet on the map larger, so it could be more detailed.)

For best possible mapping, and non-identical rivets; align and map each as above, but resize and reposition each as it is made. If you want the best possible mapping, and variation in the designs on the tops of each one, it's going to take even more very tedious work for that level of realism.

First, you will need to align them with all three axes, as above.

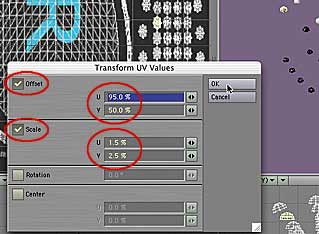
But, after you make the UVs for each one, open the Transform UV Values requester, and check both Offset and Scale. Offset 95% on the U, and 50% on the V axis. Scale 1.5% U and 2.5% V. (Fortunately, these values will persist in the requester, so you'll only need to type them in once.) This will make them all the same size, and will also bring them into the right area to move each one onto a rivet on the map as you make them. (Type a to see everything that's visible when you are ready to position them, and you'll avoid a lot of unnecessary zooming and panning.)

If you were doing this for your own model, of course, you would need to figure out those sizes yourself. (Actually, if you were smart, you'd have made the UVs before you duplicated or placed the rivets to begin with; and you wouldn't have to do most of this work.)

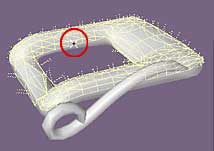
Isolate the Buckle surface, square it to all 3 axes, and then drag the tongue to one side. Which brings us, at last, to the buckle. Just one more part, and we're finished!

Unhide the model by tapping the \ (backslash) key.

Select the Buckle surface, and hide the rest of the model (=). Zoom in on just the buckle by tapping Shift+A. Rotate it, so that it's as square as possible to all 3 axes.

We'll start by getting the tongue out of the way. Select any of the tongue polys, and tap the ] (right bracket) to select all connected polys. Get the Move tool (t) and drag the tongue to one side.

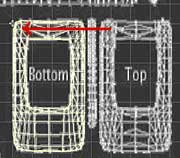
To split the surface, switch to Flat Shaded mode in a Top view viewport, and lasso all the polys. We need to split it, so we can use two different textures on the top and the bottom. Unfortunately, LW doesn't do this automatically; we'll have to do it by hand. But that's OK, because it's not hard, and we have more control this way anyhow.

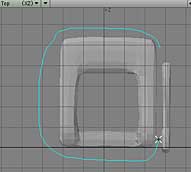
Change one of your viewports to Top view, Flat Shaded. Make sure that you are in Polygon mode, and drag a lasso around the buckle. Because it's a shaded view, you will only select the ones that are visible from this angle - in other words, the Top polys!

In other viewports, select (or drop) any polys that you feel are misplaced. Cut and Paste to split the surface. Take a look in the other views, and select any polys that you think should be part of the Top (or drop any that you think shouldn't.)

Then cut and paste! There it is, a neatly split buckle.

Make UVs, resize and positon, then select just the bottom, and position it. Finish up by merging as usual. (Don't forget to cut/paste the Padding_Strips.) Make UVs, choosing Planar, Y axis from the requester, and shrink, rotate and position as usual. Select the tongue, and move it into position. Finally, choose a poly from the bottom on the model, select connected (]) and use the move tool to drag the bottom away from the top on the map.

The final step, as always, is to delete any Mapping endomorphs, and merge the points. Go ahead and do that. Don't forget to cut the Padding_Strips and paste them back in afterwards, so the model is just like it was when we started. (With the addition of UV Maps, of course.)

There! The map is finished. Open the Surface Editor, change the Image in the color channels to VambraceColor.jpg, add the bump, and arrange the attributes on the various surfaces to your taste.

By now, you should be feeling pretty much at home with the UV tools in Lightwave. As you have seen, the only real difference between these and what you are used to is that the Lightwave tools are much more powerful, and it's much easier to do the rotations and things when you can see what you are doing!

Just one more lesson, and then you are on your own.

If you have a question, write to me and ask it!

Everything on this site is copyright © Robin Wood; all rights reserved. Please do not use anything without permission. To get permission, write to Robin, and explain what you intend to use it for.