Lightwave UV Maps for UV Mapper Users - Lesson 5

This is the fifth and final tutorial in this series. If you haven't done the first four, I strongly suggest that you go back and at least read them, since we are building on what you have already learned.

Once again, if you click on any of the pictures, you'll get a full size screen shot.

Render of the finished model. Up till now, you have been making UVs to fit maps that I have provided. This time, the only thing I'm providing is the model. I'll talk you through the process, but exactly how you lay it all out is really up to you.

So, download the Goldfish.sit or Goldfish.zip, which contains the Veiltail_Goldfish model we are going to map. Also download the Checks.sit or Checks.zip, which is the image we are going to use to help us with the mapping.

Start a new UV map, as usual (call it Goldfish_UV.)

When making a map for an organic shape, such as this fish, it's often helpful to have an image that allows you to make sure the vertices are placed to minimize distortion.

To do this, we're going to use a checkerboard pattern, both as a Backdrop in the UV Texture Viewport and as a color image on the fish itself. You'll see why as we go along.

Color_Checks.jpg for Backdrop and model Image. Load the Color_Checks.jpg for the Backdrop, and for the image on the fish, as we have done before. (You'll probably want to decrease both the Contrast and Brightness in the Backdrop, so you can see the vertices more easily.)

I hit the Tab key to turn off SubPatches, too; I don't need them for mapping, and on my (fairly old) computer, SubPatches slow things down. You can leave them on, or turn them off, whichever you prefer.

When you open the Surface Editor to assign the UV Texture and Image to the fish, you'll probably notice that there is only one surface. We're going to be selecting the polys we want to map as we get to them

Select the fish's head. When approaching a model for mapping, the first thing you need to decide is whether you want to keep all the parts in scale with each other, or whether you want to give one part more "map room" than the others.

In this case, no part of the fish is more important, except perhaps the eyes. We'll be keeping the rest in scale.

So, lets start mapping with the head.

Use the lasso to select the polys that make up the fish's head, cut and paste them, as usual, to give the edges their own points.

Select half the fish's head, copy and paste to split it down the middle. Select connected, hide the rest of the body, and let's split the fish's head right down the middle. Select one side, being careful not to get any points or polys from the other one.

Once again, cut and paste, so we have two separate halves to work with.

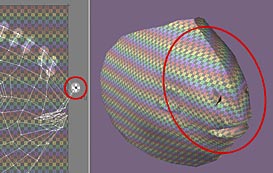
Make UVs, (Planar, X,) and take a look at the checkerboard pattern on the model.

The image is stretched across the fish's nose. Drag the points on the map to correct this. As you can see, the image is badly stretched across his nose.

To fix it, get the Drag tool (control/Ctrl T) and drag the points of those vertices, just the way you dragged the points on the wrist strap for the Vambrace. This time, though, instead of matching a pre-existing map, you are trying to make the checkerboard pattern across the nose of the fish as even as possible.

Don't be afraid to drag off the map. Don't be afraid to drag off the map; it'll wrap, remember? Also, don't worry about what the vertices on the map look like. It's the checkerboard on the nose that you want to be as straight as possible.

Zoom in as close as you need to, and take your time. This is the hardest part; but the better you can get it here, the more easily you'll be able to make the maps later, and the better your model will look.

Drag points up to move the texture image down, and vice versa. Use the colors and numbers on the squares to "find your place" so you can tell which point needs dragging to fix a problem.

Hints; if you need the image on the model to move up, pull the point down. If you need it to slide down, move the point up.

Drag points right to shift the texture to the left, and vice versa. If you need it to move right, pull left. Drag the point left to shift the image to the right.

If the checkerboard squares are too big, make the poly on the map larger, so more squares will fit inside it. If they are too small, make it smaller, so that fewer squares fit.

I know, it seems all backwards. But you'll get the hang of it.

Some areas, like the inside of the mouth, you'll have to just compromise on. If you need to, you can make a different map for that later.

When it looks good, shrink it and move it completely off the map. When you are satisfied, use the Size tool to shrink it symmetrically, and move it off the map entirely. We'll get back to it soon.

As you do, you will notice that the checker pattern stays on the model. Wrapping, remember? The vertices are still on the map, in Lightwave's point of view. They just aren't in our way any longer.

Select the top polys on the Dorsal fin, then Expand Selection to get the whole fin. Unhide the rest of the model.

Let's do the fins next, because they are going to be fairly easy. That will give us a bit of a break, and get them out of the way!

We'll start with the Dorsal fin, which will be the simplest one.

Select the topmost line of polys, and then Expand the selection until you have the whole fin.

Make UVs, then shrink and move off the map. Cut and paste, as usual, and Make UVs. Check it out on the model; there isn't enough stretching here to notice. So just go ahead and shrink this part, and move it to the side.

As you do, keep your eye on the model. Try to get the checkerboard squares as square as possible, and also try to make them about the same size as the squares on the head. We will probably need to resize them all later, and it will be easier if they are in roughly the correct scale and proportions now.

Repeat for the tail fin. Repeat for the tail fin, dragging the points as necessary to eliminate any stretching (most noticeable where it joins the body.)

When you are happy with it, resize, exactly as you did with the dorsal fin, and move it to the side. (You might want to disable "Show Polygon Selection" in the Display Options, Viewport tab, so you can see the pattern on the tail more easily in the Perspective view.)

Map the other three fins, correcting any stretching problems as you find them. Hide the tail, so you can get to the remaining three fins more easily, and map all of them exactly the same way.

Remember to check each one for stretching as you make it, and to correct any problems that you find. (Once again, some compromises might be necessary.).

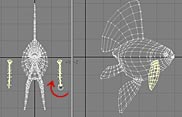
Make a Mapping endomorph for the front fins, if you want. For the front fins, you might find it easier to simply make a Mapping endomorph. If so, go ahead and do that. (It's easier to swivel both fins if you have enabled Symmetry, by the way.)

The point is to map everything as easily and accurately as possible, not to follow a set of "rules."

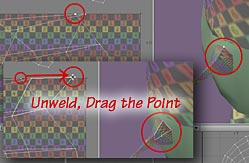
Unweld points to drag them without affecting the conneting poly. If you encounter a point that you cannot adjust without throwing another section way "out of whack," like the front poly of the front fin, there is a very easy solution.

Simply select the point, or points, that are causing the undesirable stretching, and Unweld them. Then select the poly that you want to change, and use the Drag tool to move just that point where you need it. (If any polys are selected, the Drag tool will only work on them; so it's the perfect way to separate points that are lying on top of each other.)

Be aware that, depending on which points you unweld, you may no longer be able to Select Connected. It's not a problem; you'll just have to lasso the part. It's just something you need to watch out for.

When all the fins have been mapped, it's time for the body. This is the hardest part, which is why we are left it for last. You'll find it on the next page.

If you have a question, write to me and ask it!

Everything on this site is copyright © Robin Wood; all rights reserved. Please do not use anything without permission. To get permission, write to Robin, and explain what you intend to use it for.