
This is the second page of this tutorial. If you haven't finished the first page, please go back and do so now.
At the bottom of your screen, you will see a row of buttons. The first two on the left are labeled Points and Polygons. Those determine whether you'll be working with the points or the polys that form the object.

When you first open LightWave, you will be in Points Selection mode. Click on the Polygons button now to change to Polygon Selection.
Use the Trackball button ( ![]() ) in the Perspective viewport, and move your tower so you can see the top. Click on that top polygon. When you do, you will notice that it now has a yellow outline, and a dotted yellow line extending up from the center of it.
) in the Perspective viewport, and move your tower so you can see the top. Click on that top polygon. When you do, you will notice that it now has a yellow outline, and a dotted yellow line extending up from the center of it.
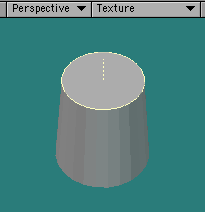
The yellow outline shows that the poly is selected. The dotted line shows the direction the Polygon Normal faces. Since you can't see polys in LightWave unless they are facing you, this is very important.
We need to build the crenellations, and in order to do that, we need to have more geometry, or polygons, to work with. (You'll see why in a moment.)
In LightWave, there are several ways to increase the numbers of polys. You'll find most of them on the Multiply tab.
![]()
The one we are going to use right now is Bevel, so make sure that top poly is still selected, and click on the Multiply > Extend: Bevel button.

Hold down the ctrl/Control key to constrain the bevel, and drag to the left in any viewport. As you do, watch the Top and Back viewports. You will see that large circular poly shrinking, leaving a ring of flat polys behind it.
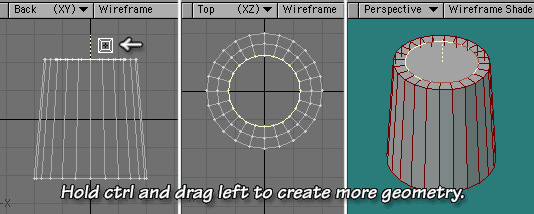
Make that ring about the size you want for the depth of the crenellations, (I'm using an Inset of around 200 mm,) and then tap the spacebar to accept the beveling, and drop the tool.
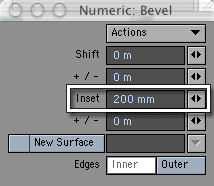
Tap the spacebar again to drop the selection.
We need to be able to see those polys in the Perspective view; so if you can't see your wireframe, change the Sketch color (Detail > Polygons: Sketch Color) so you can.
It would be easier to see what we were doing if the tower was filling the viewport; so tap a on your keyboard, to zoom in on the visible polys and center them in all viewports. (You may need to pan down slightly in the Perspective viewport after doing this. Use the Pan button, or hold down Shift+alt (Shift+Option on a Mac) and drag down.)
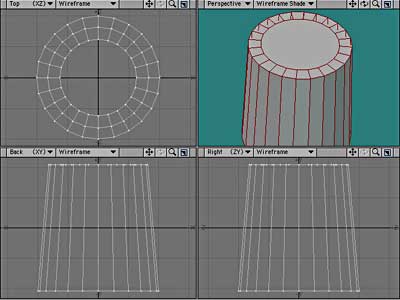
We need to select every other poly in that top ring to make the crenellations. The cursor should look like an X, which shows that you are in Polygon selection mode, and no tools are active. If any are, you won't be able to add or drop polys from your selection. If that's the case, click on the tool's button, or tap the spacebar to drop the tool. (A quick way to check is to glance at the Numeric Panel. If there's something there, you have an active tool.)
Working in the Perspective veiw, click on one of the polys in the top ring. Notice that it becomes outlined in yellow, showing it's selected. (If you can't select it, and none of the tools are active, you still have some polys selected. Tap the Spacebar to drop them.) Now, hold down the Shift key to add to the selection, skip a poly, and click on the next one. If you accidentally click on one you don't want, release the Shift key, and click on it again to deselect it.
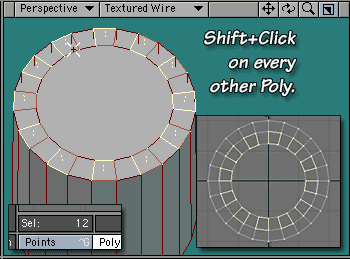
When you are finished, you should have 12 polys selected, as shown in the Sel: indicator at the bottom left, above the Points button. (It's a good habit to look here frequently, to see if you've selected the number of points or polys you think you have.)
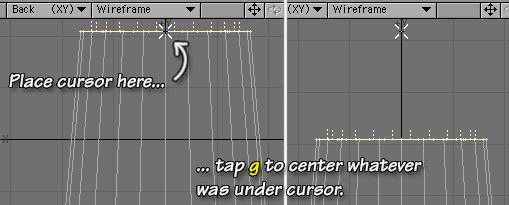
Now we need to add the crenellations, and we'll be working in the Back viewport. But there's not enough room above the object to add much, is there? Let's fix that. Put your cursor on the selected polys in the back viewport (don't click anything) and tap the g key to center whatever was under the cursor in the viewport.
Get the Bevel tool again, by choosing it from the Multiply tab or by tapping the b key, and drag up and to the left in the Back viewport. As you do, you will probably notice that you have very little control. The bevel snaps into place, and the crennelations are tiny at the top. That's the Grid Snap in action. It's handy sometimes, but we don't want it right now.
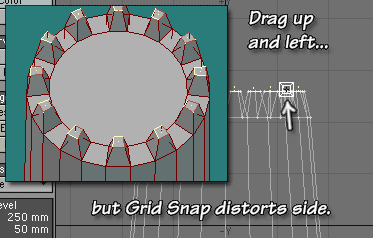
So, click in the empty area below the toolbar to cancel the tool operation. You can always do that, if you don't like the effect you are getting.
Tap d to open the Display Options Panel, and click on the Units tab. Set the Grid Snap to None.
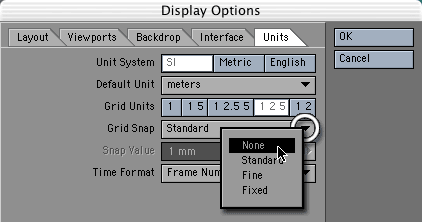
Now try again. Much better, huh? Notice that the tool stayed selected the whole time. They do that.
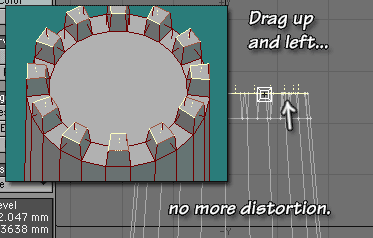
As you bevel, notice that both Shift (away from the Surface Normal) and Inset (change in poly size) are being applied to each poly, so each one gets a truncated pyramid shape. Bevel works that way, on all selected polys, or on all visible polys if nothing is selected.
In addition, mouse movement up and down always controls Shift, and movement right and left controls Inset, regardless of the orientation of the polys being beveled. Also, up and right will always increase the shift or inset, and down and left will always decrease it. It was easy in this instance, because those motions corresponded to the intuitive directions since the poly normal was facing up. But it's not always that simple. (You'll have a chance to see what I mean in a bit.)
Until you get the hang of it, it might be easiest just to position your model so the normal is facing up before you use the tool. You can put it back later, if you have to.
Click the Bevel tool, or tap the b (for Bevel) or spacebar to drop the tool and accept the new shape.
Drop the selected polys by clicking in the area below the tool buttons, tapping the spacebar, or tapping the / (slash) key, and select the large central poly instead, by clicking on it in the Perspective view.
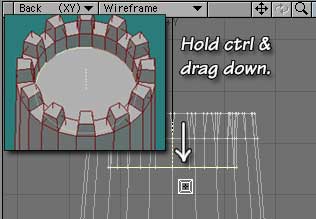
Using the Bevel tool, make one more bevel, straight down, to form the floor of the wall walk, so the defenders can crouch behind the crenellations. If you want to make it perfectly straight, hold down the ctrl/Control key to constrain the movement to Shift only.
And that's the tower! Save your work, if you haven't already. Then let's go to the next page and we'll put a door in the tower.