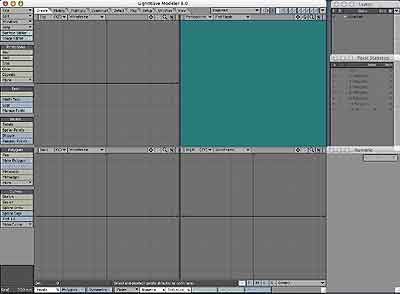
We are going to make a very simple sand castle, to familiarize you with a few of the tools and techniques of working in LightWave. There is a lot of material here; more than you might want, in fact. So, instead of flooding you with all of it, I've provided links throughout the tutorial. Click on them for more information, additional keyboard shortcuts, and other ways to do things.
Start by opening Modeler. It's always a good idea to have plenty of Undos, so if you haven't increased them before, do that now.
If you are using the Default Layout, you should be seeing four panels, or Viewports. (If you aren't, and don't know how to change your Display, click here.)

Along the top of each Viewport is the Viewport Titlebar. You can choose the View and Rendering Style from the menus on the left. The Navigation Tools are on the right. (You can also use the Keyboard for navigation, of course.)
![]()
If you are using the Default settings, when you pan or zoom, all the viewports will pan or zoom at once. If that makes you nuts (like it does me,) it's easy to change.
For this tutorial, make sure your TL (top left) Viewport is set to Top, TR to Perspective, BL to Back and BR to Right. Set the Perspective view to Textured Wire if your computer is fast enough (or Wireframe Shade if it's not) and the rest to Wireframe.
We are going to be using several of the special Windows frequently as we model, so it's easiest to have them visible and available all the time. The arrangement I use is the one shown above, and it's easy to set up. (If you don't have enough screen real estate to do this, feel free to call the panels as you need them, or set up your own Workspace to your own tastes.)
Ready? Let's start modeling! (You will need the Numeric Requester open to follow along. If you don't have it open already, tap n on your keyboard to open it.)
Remember I said this was going to be a simple sandcastle? Well, I meant it. It's just going to be a tower (the kind you make by inverting a bucket filled with sand,) with crenellations, a door, and a flag.
First, we need the tower.
So, click on the Create tab at the top of the window. All forms and shapes start here.
![]()
Towers are pretty much cylindrical in shape, so we'll start with the Disc, which is LightWave for "Cylinder." Click on the Disc button, in the Primitives section, to get the tool. You'll see your cursor change shape.

Move the cursor to the center of the Top viewport, click in the middle of the viewport, and start to drag in any direction. You will see a circle form, with cyan corner and side handles, and a cyan cross in the center.
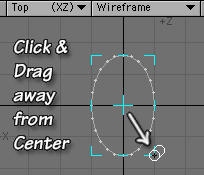
As you drag, you will see the numbers change in the Numeric Options requester, which is now titled Numeric: Disc Tool.
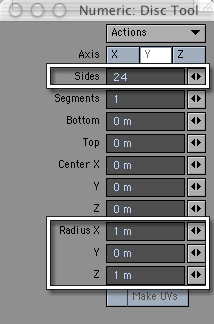
Hold down the ctrl/Control key, and click one of the cyan corner handles. You will notice that the shape snaps into a perfect circle, and the Radius X and Z numbers in the requester now match. The ctrl/Control key is used to constrain things in LightWave. Whenever you want to Create a symmetrical Object, or constrain movement to a single axis, use this key.
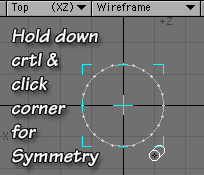
Pull out a circle with a radius of roughly 1 m. (Yes, that's mighty large for a bucket, but it's a good working size; we can resize the model later if we want to.) Make sure that the number for Sides in the Numeric Options is 24.
If you look at the Back viewport on the bottom left, you'll see a flat line, with cyan bits in the middle and at both ends. That's the circle you made, viewed from the edge. Release the ctrl/Control key, place the cursor on the center cyan line, and drag towards the top of the screen.
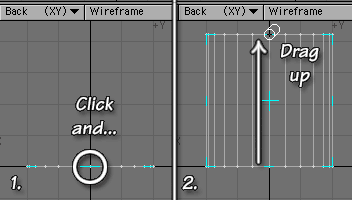
As you do, you'll notice that you are pulling the cylinder into the third dimension. That's the way all the primitives in LightWave work. First draw the cross-section in the viewport perpendicular to the desired "long" axis, then pull the shape into the third dimension in one of the other viewports.
Drag it out until the Y Radius is a little more than 1 meter. It needs to be a bit bigger than the circle, but not too much bigger. (We're going to add more to the top soon.)
When you are happy with the cylinder, click the Disc button again to make (accept) the object.
Tap the F2 key (or go to the Modify tab, and choose Translate: Center) to center the disk at zero on all three axes. That's a good habit to be in, since it makes it much easier to make symmetrical objects.
Right now, this shape doesn't look much like a bucket. Let's fix that.
Click on the Modify Tab, to see the Modify tools, so we can (surprise!) modify the shape.
![]()
We need to taper the cylinder, so click on Transform: Taper Constrain (the Taper Evenly tool.)

We want to be sure that the cylinder stays perfectly symmetrical, so we need to check the Mode we are working in. You'll find the Modes button at the bottom of your screen. It has a black triangle, which shows that there's a pop-up menu hidden there. Click on it, and you'll see a number of choices.
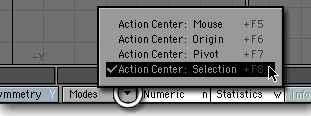
Right now, since we want symmetry, we'll choose Action Center: Selection. That puts the center of the modification in the middle of a bounding box containing the whole object, so it will act equally on all parts, and ensure symmetry. (In LightWave, if nothing is selected, the program acts as if everything is.)
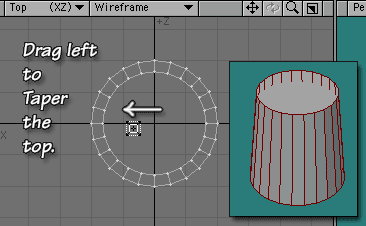
All the tools like this (Bend, Twist, Taper, Pole, etc.) work in the viewport that is perpendicular to the axis that you want to use for the transformation. In this case, we want to taper the top so it's smaller than the bottom. That means we want to taper along the Y axis (top to bottom) and that means that we will be working in the Top viewport.
Move to the Top viewport, and place the cursor in the middle of the disc. (It doesn't matter exactly where, which is the beauty of Action Center: Selection.)
Leave the tool at its default settings, and drag slowly to the left to decrease the top diameter to a factor of around 80%. When you are happy with it, drop the tool by tapping the spacebar (which is another way to drop tools and "make" changes or objects.)
So far, so good. Let's add some crenellations to our castle. On to the next page!