Using the Photoshop PSD Filter to quickly add reflections to transparent surfaces.

This tutorial is a continuation of the Glass and Transparent Surfaces tutorial. If you are having problems with glass, refraction, etc. you may want to go through that one first. Both were written for Lightwave 7.5. Most of the images are shown fairly small, to ease download time. If you would like to see them full-size, just click on the picture.

Add the Photoshop PSD Image Filter. You can render glass with Ray Traced Shadows, Ray Traced Refraction, and Caustics fairly quickly in Lightwave; but if you add Raytraced Reflection to the mix, the render bogs down to glacial speed. (As you will know, if you have ever tried it.)

But what if you really need reflections? Do you just have to put up with nearly interminable renders? Not a bit of it.

Lightwave ships with a little filter called Photoshop PSD Export that will solve this problem. (Actually, it can solve a lot more problems than this one, because it breaks a render down into its components in a sort of simultaneous multi-pass, and saves them together in a Photoshop file with clipping groups. But we're going to ease into it, and just do this one thing at the moment.)

To use it, render your image as usual, with Caustics, Refraction, Ray-Traced Shadows and all, and save the render.

Click on the Scene Tab, and then click on Image Process in the Effects section of the Toolbar.

This will open the Effects Requester to the Processing tab. At the bottom of the Requester, there is a place to Add Image Filter. Choose Photoshop PSD Export from the drop down list.
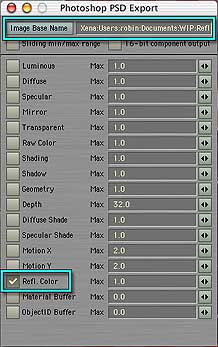
Name the Base Image, and enable Refl. Color. Double click on the filter name (or Edit > Properties from the menu above the filter) to open the Filter Requester.

At the top, there is a field called Image Base Name. That allows you to (surprise!) name the Photoshop file this filter generates, and specify where you would like to save it. Click on the Image Base Name button to open the normal Browser for your system, find the folder where you want the file to go, and give it a name. Don't worry about a suffix. Lightwave will add the .psd, and number the frame as well, so you can save a whole series without worries.

Below that are a whole bunch of things you can separate from the render. Every one of them will show up as one layer in the Photoshop image. For right now, the one you want is Refl. Color, third from the bottom. Disable any others, and leave Sliding min/max range and 16-bit output at their defaults. That will save the Ray-Traced Reflections, and nothing else. Since each layer does take a tiny bit of time and disk space, why save more than you need?

When you have finished, close the dialogs.

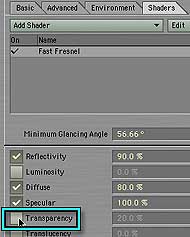
Disable Transparency in Shaders and Basic Tab. Open the Surface Editor, and remove Transparency wherever it is used in the objects you want reflections on. (Don't forget to disable it in any shaders, as well as setting it to 0.0% in the Basic tab.)
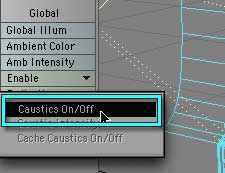
Disable Caustics Disable Caustics, unless you have one cast by reflection (as opposed to through transparency) and you expect it to be visible in the reflection. (If you really need caustics in the reflection, your best bet is probably to burn them onto the surface they are cast onto. They won't be exact, but that should do for a still picture, or if the casting and receiving objects don't move during the animation.)
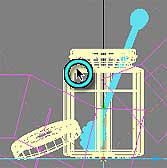
Select objects to catch reflections, and objects in front of them. Select only those objects that will be catching reflections, and the objects in front of them (if any.)

If you don't select the objects in front, you will have to manually mask them out before you apply the filter. It's lots easier just to select them, unless you are using multilayer rendering (rendering objects separately, to composite later) already.

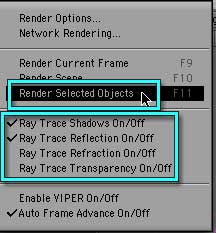
Disable Refraction, Enable Reflection, and Render Selected Objects Click the Rendering button on the menu bar, and disable Ray Trace Refraction. Leave Ray Trace Shadows enabled if you were using it, and think there will be a shadow in the reflection. Enable Ray Trace Reflection, and then Render Selected Objects (or just tap F11.)

The render should finish relatively quickly.

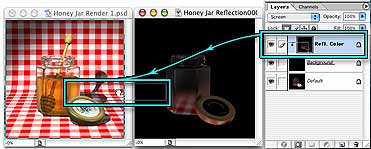
Use the Move tool, and Shift Drag the Layer onto the Render. When it's done, open Photoshop. You don't need to save this render, since Lightwave has already saved the file generated by the filter.

Open both the first render, and the generated Photoshop file. (It'll be called whatever_you_named_it0000.psd)

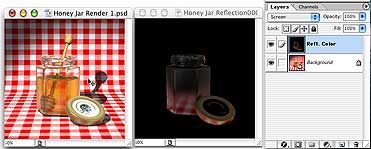
If you look at the Layers palette, that generated file will have a bottom layer called Default, a solid black layer called Background, and then the Refl. Color as a Clipping Group layer. (You can tell by the little right angle arrow.) If you ever need to unclip the layer, of course, you simply hold down Option/alt and click just between the layers on the left of the palette. Right now, though, we can leave it as it is.

All you have to do is put the two files near each other, get the Move tool (v) then click anywhere on the Refl. Color layer in the Layers Palette, hold down the Shift key, and drag the layer over the Render.

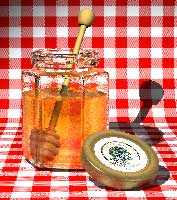
Presto! Reflections! It will appear, nicely centered (that was why you held down the Shift key) already set to Screen mode. And you will have Reflections on your glass, just like that, in a fraction of the time it would take to render them in a single pass!

Is that easy, or what?

Aborted Render in Progress. Looks the same, takes MUCH longer. To give you an idea of how small a fraction, the honey jar shown here took 46 min. 31 sec (2791.4 seconds) to render at 480x480, using Refraction, Ray Traced Shadows, and Caustics. The Reflection pass took about a minute to set up, and 3 min 33 sec (213.1 seconds) to render. It took less than a minute to add the reflections to the jar in Photoshop, for a total of 52 min 4 sec (more or less.)

In contrast, I stopped the render that used Ray Traced Shadows, Reflection, Refraction, and Caustics after 22 hours, 30 min, because I wanted to use my computer. It was working on the second of 5 passes when I aborted it.

In fairness, you won't be able to use this if you need a lot of internal reflections. Although, in many cases, the results will be indistinguishable from the time consuming method, in some cases there will be a distinct difference. When in doubt, render a very small picture without anti-aliasing, and see. But if you don't have time for long reflection renders, and it's a trick or nothing, this can save your bacon.

It's just a tiny taste of what the Photoshop PSD Export filter can do for you, of course. I'll be posting more tutorials about it as I have the time; but in the meantime, you may want to just play with it. It can be one of your best rendering friends!

If you have a question, write to me and ask it!

If this tutorial has come lose from the frame it's supposed to be in, or is in someone else's frame, just click here to fix that. (You may need to select the Quick Reflections tutorial after clicking.)

Everything on this site is copyright © Robin Wood; all rights reserved. Please do not use anything without permission. To get permission, write to Robin, and explain what you intend to use it for.