Glass and Transparent Surfaces in Lightwave

This tutorial was written for Lightwave 7.5. There are files available for you to download if you would like; but they are not required to complete the tutorial. Most of the images are shown fairly small, to ease download time. If you would like to see them full-size, just click on the picture.

A ray is bent when it hits a poly with a refraction value. In order to get transparent objects to render correctly in Lightwave, it's necessary to understand how Lightwave calculates refraction.

First, remember that the backsides of polys are invisible to the Lightwave renderer.

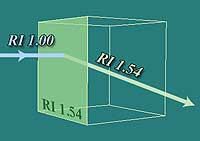
Every time that a render ray passes through a transparent surface with a refraction value other than 1 (air,) everything "seen" beyond that point is rendered with that refraction value, until the ray hits something with a different refraction value

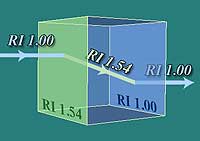
If the ray hits another poly with a different refraction value, it's bent again. In other words, if a ray hits a surface with a refraction value of 1.54 (flint glass,) it will keep on rendering with the rays bent to that refraction until it hits a different one.

Since the polys on the outside of the glass are invisible to a ray coming from this side, there is nothing to bend the ray back to "air" unless you put polys with a refraction value of 1 facing the ray.

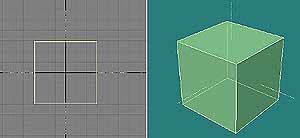
Glass Polys with Normals facing out, and RI of surface, exactly like non-transparent surfaces. In practical terms, this means that all of your transparent surfaces need to have two sets of polys. One with the refraction value of the material, and the normals facing out.
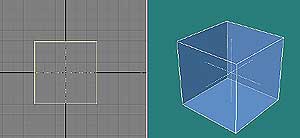
Additional Air Polys, with RI of 1 and normals facing in. One with the refraction value of air, and the normals facing in.
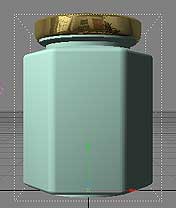
Jar loaded into Layout, ready for Surface. If you would like to follow along with me, and try this out, you can either make an object, or you can download the HoneyJar.lwo .sit or .zip that I've prepared. (The maps for it are in the same file.)

Load the HoneyJar (or your own object) into Layout, and let's make a glass surface for it. (If you're using the Honey Jar, you may notice that I've already set color and bump. They aren't important for transparency, so I'm skipping those in this tutorial.)

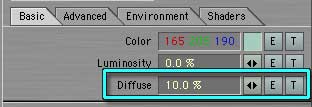
Diffuse Value needs to be low. As mentioned elsewhere on this site, in order for a material to look transparent, very little of the light that hits it should bounce back to the viewer. That means that you need to cut the Diffuse value way down. Say, 10% or so.
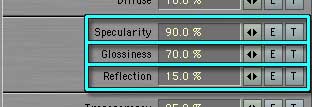
Specularity and Glossiness should be high, Reflection to taste. Specularity should be fairly high, of course, because glass is shiny. Set it to 90%.

Glossiness should be on the high side, too, because the glass is smooth and hard. Say, 70%.

Let's set the Reflection low, and use the Fast Fresnel shader. (It's cheap, and looks good for almost no increase in render time.) I'm going with 15%.

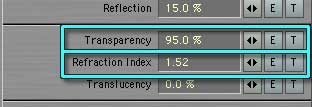
Transparency should be high, Refraction Index the actual RI for glass. Transparency should be high again, say 95%.

Refraction index is the setting that makes the difference between glass, water, acrylic, etc. It might be worth looking up the actual Refraction of the material, if you aren't sure what it should be.

Since this is common glass, we are going to use the common crown glass Refraction Index, 1.52.

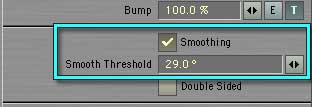
Set smoothing just high enough to round the beveled edges on the corners, without getting dark shading on the large flat areas. Because there are beveled edges on this jar, let's add a little Smoothing. We don't want to lose the nice clean flatness of most of the surfaces, so we don't want too much. Let's use 29.0°.

This setting means that the software will smooth the normals of any two polygons that join with an angle of 29° or less; but it will leave sharp edges if the angle is greater than 29°.

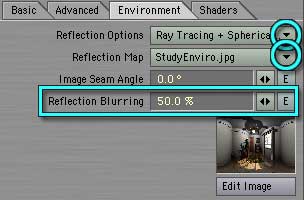
On Environment tab, click Reflection Options flippy to choose the mode, then the Map flippy to load an image. Only mirrors reflect sharp images; so let's blur the reflections on this glass. Click on the Environment tab, and set the Reflection Options to Ray Tracing + Spherical Map.

If you want to give it something to reflect, you can load the EnviroStudy.jpg into the Reflection Map. (Included if you downloaded the jar; or, you can grab it here.)

Otherwise, just leave it as (none). Set the Reflection Blurring to 50% or so. (Note; Reflection Blurring can seriously slow down renders, especially if it's set to over 100%. Be aware of that while working with it.)

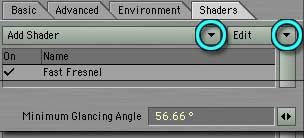
On the Shaders tab, click on the Add Shader flippy and choose Fast Fresnel from the list. Finally, let's enable the Fast Fresnel shader I mentioned earlier. Click on the Shaders tab, and choose Fast Fresnel from the Add Shader list.

Double Click on it to open the options for the shader. The first one, on a line by itself, is the Minimum Glancing Angle.

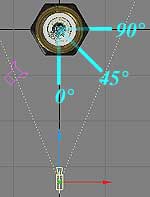
Minimum Glancing angle. 0° is pointing at the camera, 90° is perpendicular to it. The Minimum Glancing Angle is the angle at which the settings in the Basic tab begin to change to the settings in the Fast Fresnel options. (0° is pointing at the camera, and 90° perpendicular to it. So, for a sphere, the center would be 0°, and the edge would be 90°.)
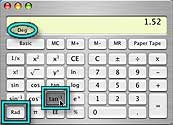
Make sure you are in Degrees (not Radians,) enter the number, and hit the aTan button on your calculator. For better accuracy, you should set this to the Brewster Angle for the material. (Thanks, Arnie Cachelin.) I'm not going to go into a lot of math, but for our purposes that angle is the ArcTan of your Refraction Index.

Since we are using a Refraction Index of 1.52, we just pull out our handy-dandy Scientific Calculator.

Make sure you are working in degrees, enter 1.52, and hit the ArcTan (tan-1) button. The answer is 56.659292yadayada, so just type 56.66 into the Minimum Glancing Angle field, since it will only use 2 decimal places anyway.

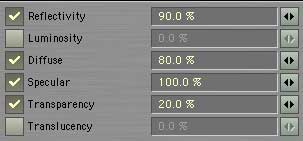
Click the properties you want to change with angle, and enter the percentage you want at 90° Glancing Angle. In the options fields, set the values for the edges of your surface.

The Fresnel (fre-nell) equations show that reflection increases with viewing angle. That's why the surface of a lake looks reflective if you look across it, but much less so if you look down into it. So the Reflectivity should be higher than the setting in the Basic tab. Let's make it 90%, so the edges of the glass are almost as reflective as a mirror.

Luminosity is zero, and needs to stay at zero, so make sure that's unchecked.

The apparent edges of a transparent surface react to light more than the center, so increase the Diffuse value. Let's make it 80% at the edge. Specularity will increase, too. Let's set it to 100%.

Transparency decreases with viewing angle. Once again, think of the lake. It seems much clearer looking down into it that it does looking across. Let's bring this glass down to 20% Transparency at the most extreme angle.

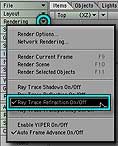
Enable Render Refraction in Render Options to see the refraction. And that does it! The glass material is set.

If you enable Render Refraction in the Render Options, and render now, you will see the refraction.

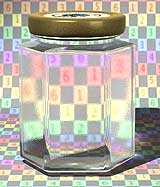
Rendered jar; it looks wrong, because the refraction doesn't change. But you may notice that the jar doesn't look like a jar. It looks more like a paperweight. Something made of solid glass.

You can't see any interior, even though the geometry is there, because there is nothing to change the Refraction Index.

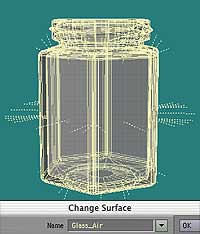
In the Polygon Statistics dialog, choose the Glass surface, and click the + to select all the Glass polys. To fix it, load HoneyJar.lwo (or whatever name you saved it as when you saved its nice new glass material) into Modeler. Make sure you are working in Polygon mode, and that Polygon Statistics is open (tap w if it's not, to open it.) Choose Glass from the Surface pop-down menu near the bottom of that window. Click on the + to select all polygons with a Glass surface.
Copy, paste, and flip the polys. Then change the surface, without dropping the selection. Copy the polygons, paste them right back, and tap f to flip the normals. Now, while they are still all selected, tap q to give them a different surface. Call it something like Glass_Air, so you know where it's coming from, and what the Index of Refraction will need to be.
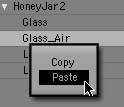
Copy the Glass surface to Glass_Air. Open the Surface Editor, and right click (command+click if you are on a one button mouse) on the Glass surface. Choose Copy from the drop down menu. Right click on the Glass_Air surface, and paste.

That will copy the entire surface from the Glass to the Glass_Air, of course.

Change RI to 1.0 Make sure you're working on the Basic tab, and change the Refraction Index to 1. You may notice that the preview suddenly looks like a soap bubble more than like glass. That's good.

I usually leave all the other attributes set up exactly the same; but some people seem to think that turning off Fast Fresnel, Blur Reflection, etc. speeds up the render without sacrificing quality. I'm not convinced; so I leave it. But you, of course, can do whichever you think is best.

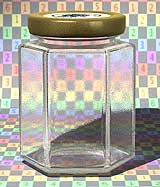
Render now, and the jar will look right! Render now, and you will have a nice, empty jar. Just like that!

Want to put some honey into it? Go Page 2, and we'll do that.

If you have a question, write to me and ask it!

If this tutorial has come lose from the frame it's supposed to be in, or is in someone else's frame, just click here to fix that. (You may need to select the LW Glass tutorial after clicking.)

Everything on this site is copyright © Robin Wood; all rights reserved. Please do not use anything without permission. To get permission, write to Robin, and explain what you intend to use it for.