Glass and Transparent Surfaces in Lightwave

This is Page 2 of a 2 page tutorial. If you haven't read the first page, you may want to do so. On this page, we are going to fill an empty vessel (a jar, if you downloaded the model provided, or whatever you made,) with a transparent, colored volume.

Select the inside polys using the UV Map, where they are already separated from the outside. Select the Glass_Air polys using the Polygon Statistics, just the way you did the Glass polys, and tap the = key to hide everything else.

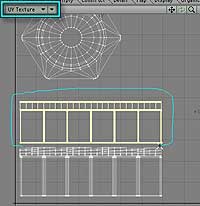
Now, set one of the Viewports to UV Texture, and select Honeyjar UV from the T menu at the bottom right of the screen.

Since I've already split the inside from the outside, we might as well use that! (If you are using your own model just select the bottom polys on the inside, and expand the selection (tap}) until you have selected all the inside polys past the desired fill level.)

Use the Right Mouse Button (or Command+Mouse Button) to draw a lasso around the polys that make the inside of the jar. (They're the top one on the map; the ones without threads.) When they are all selected, hide the unselected polys once again by tapping the = key. Drop the Selection.
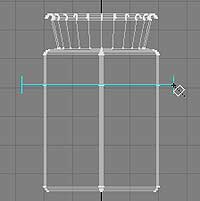
Use the Knife tool to cut the honey level. Get the Knife tool (Shift K or Construct > Knife,) hold down the Control/Crtl key to constrain the movement, and cut a straight horizontal line where you want the top of the honey to be.

Drop the tool, and use the lasso to select the polys above the line. Hide them by tapping the - (minus) key.

Use the Right Mouse Button to lasso the points at the top of the honey. You should be left with the shape from the inside of the jar, polys facing out, and no top.

Switch to Points mode, and use the Right Mouse Button to lasso the points at the top of the shape.

A perfect poly has all the points in order, and isn't non-planer. Tap p to make a polygon from those points. If you are lucky, you'll have a perfect polygon, and you won't need to select individual points in order. If you aren't, they will need to be selected; but don't do that quite yet.

Right now, while you don't have anything else on the screen, tap q to change surface and assign this surface a Honey material.

Select the points, in order, clockwise, to make the poly. Now, if the poly is misshapen, select it, hide everything else (=, remember,) tap k to kill the poly, and select the points in order. (Select clockwise for a poly that faces you. So, from the top, select clockwise for a poly that won't need to be flipped.)

Tap p again to make a perfect poly, make sure its normal is facing up, and assign it the Honey material too. Tap m to merge the points, just to be sure.

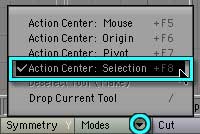
Make sure the Mode is "Action Center: Selection." Honey is quite viscous, so we need to model the viscosity into the meniscus where the honey meets the jar.

Make sure you are working in Action Center: Selection, so the poly will resize evenly all the way around, and stay centered in the middle of the honey.

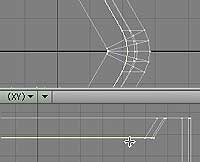
Zoom into the edge of the honey in the Top and Back viewport. (Put your cursor where you want the center of the zoom to be, tap g to center that spot, and drag the magnifying glass to zoom.)

Smooth Shift, then Size to start making the meniscus.

Select the top poly, and tap F (shift-F) to Smooth Shift. Click once in any viewport to create the extra poly, but leave it the same size and position.

Tap H (shift H) to accept the Smooth Shift, and get the Size tool. Working in the Top viewport, resize the poly so it's a tiny bit smaller.

We're doing it this way because it's really, really difficult to control the smooth shift most of the time. This sequence makes the new polys, then allows you to resize and reposition them manually. If you have no problem doing it all in a single move with Smooth Shift, by all means do that.

Smooth shift, resize, and move the new polys down a tiny bit. Tap F, click, and tap H again. Make the new poly a little smaller once more.

This time, after you make it smaller, tap t to get the Move tool. Hold down Control/ctrl to constrain movement, and drag it down a bit in the Back viewport.

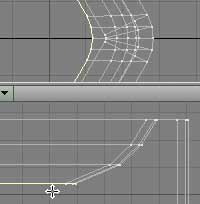
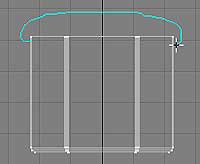
Continue Smooth Shifting, Resizing, and Moving until you have completed the shallow bowl shape of the meniscus. Continue with the Smooth-Shift, Size, Move routine until you have made a shallow curve like the one shown in the picture.

(By the way, we used Smooth Shift instead of Bevel, to keep the corner points from collapsing in on each other. This is not only a whole lot less work; it's more realistic as well.)

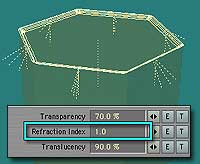
Give this honey a RI of 1.504, and 90% Translucency. Set up your honey material using the same steps you used for the glass. The Refraction Index of honey varies by water content. Let's use nice think honey, with 13% water, which has an RI of 1.504. I'll let you set up the rest of this surface, for practice. (You can see what I used here.)

There are just two major differences between these surfaces. First, honey is not only transparent, it's Translucent as well. So set the Translucency to something pretty high; say 90%.

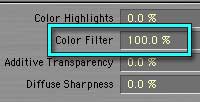
Set Color Filter to 100% to color the transparent material. Also, light going through the honey comes out honey colored. To show that, click on the Advanced tab. At the bottom, where it says Color Filter, put in a percentage to show how much of the honey color the light picks up. I'm using 100%, since the jar of honey I have here shifts the colors of everything I see through it.

(That's how you get colored transparency in Lightwave, of course.)

Make Honey_Air polys to in case you ever want to render from below the Honey Level. Now, let's think of the ray hitting the different refractions, and make sure we'll get what we want.

First, it hits the glass, and picks up the glass refraction. Next, it goes into the honey, and gets that. The next poly facing the camera is glass again, so that the ray will bend correctly for glass, and finally, it hits the Glass_Air poly and is returned to a Refraction Index of 1. That's perfect. There are no additional polys needed for the sides of the honey surface, because it's in the jar.

Going from the top, it's the same. There are polys for each Refraction Index needed. But, if you send a ray from the bottom to the top, there aren't any polys on the top of the honey to switch the RI back to air.

We'll need to make them. Fortunately, that's easy.

Just select the center poly, and tap } (Shift right square bracket) 4 times to Extend the Selection, and select all the polys that form the top of the honey. Copy, Paste, Flip and make a Honey_Air surface, just as we did for the Glass_Air earlier.

Change the Refraction Index on this surface to 1.00, and you're all set, even if you render the jar from the bottom.

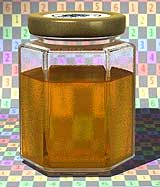
Render of filled honey jar. And that's it! Render, and admire your jar of honey!

(By the way, if you did this exercise with my honey jar, feel free to use it in anything you do for personal use (not pay,) but please don't sell the model, or give it away. If a friend wants it, tell them where to download it, please. If you do use it, it's considered courteous to credit the artist. (Me, in this case.)

(If you want to use it for something you'll be paid for, please contact me for permission.)

If you have a question, write to me and ask it!

If this tutorial has come lose from the frame it's supposed to be in, or is in someone elses frame, just click here to fix that. (You may need to select the LW Glass tutorial after clicking.)

Everything on this site is copyright © Robin Wood; all rights reserved. Please do not use anything without permission. To get permission, write to Robin, and explain what you intend to use it for.