Your donations make more tutorials possible. Thanks!
This page builds on things that were covered in Painter Weaves Page 1. If you haven't finished that tutorial, and you encounter things you don't understand in this one, you might want to go back there and take a look at it.
 This design is only a little more complex than the picnic twill. But it looks more intricate, because instead of simply repeating the design, it's set to flip and repeat.
 The way that Painter does this is to read each column of thread colors until it gets to the | (Pipe, normally typed as Shift+Backslash.) At that point, it begins to repeat them in reverse order, until it gets back to the beginning, and then it repeats again.
So, in this plaid, there is a column of white thread, then one of blue, one of red and one of black. After the black, it flips the pattern and repeats the red, then the blue, then the white, flips again and repeats the blue, the red, the black, and so on.
Numerically, this would look like 1, 2, 3, 4, 3, 2, 1, 2, 3, 4, 3, 2, 1, 2, 3, 4...
 When we set this up in the Edit Weave dialog, the color part is pretty straightforward, and just what you would expect from the first part of this lesson. We're using 8 white threads, 30 blue ones, 4 red, and 20 black. So, in the Warp Color text box, type [W 8 B 30 R 4 K 20|] You can think of it as White 8 Blue 30 Red 4 BlacK 20.
Where it gets a little tricky is when we come to the Expands to number. We need to allow enough columns to go through the entire sequence, from 1 back to (but not including) 1. In other words, we have to tell Painter to draw all the threads in 1,2,3,4,3,2 before it repeats. If we get this wrong, we'll have repetition errors, like the ones you can see in many of the presets (which, as mentioned above, are mostly set to 400.)
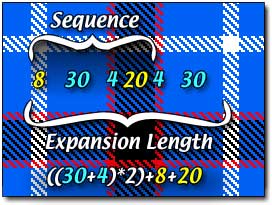
 So, we need to 1. Add the numbers of threads for all the columns except the first and last, 2. Double that number (to allow for the repetition,) and then 3. Add the numbers of threads in the first and last columns.
For this example, that means that we add 30 + 4 to get 34, multiply that by 2 to get 68, and then add 8 for the first column, and add 20 for the last, for a final total of 96. That's ((middle numbers) * 2) + first number + last number = Expansion, or in this case, ((30+4) * 2) + 8 + 20 = 96.
So finish filling in the expression by replacing the Expansion number with -> 96 for both Warp pattern (since it's divisible by 4) and Warp Colors. Click the two Tromp as Writ buttons to copy the sequence to the Weft pattern and Weft Colors, and you're ready to test it by filling a new layer!
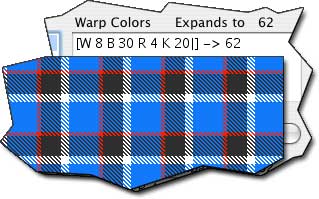
 Of course, if you don't want to flip the colors, you don't have to. Just add them all, and use that for the Expansion number.
So, in this example, 8 + 30 + 4 + 20 = 62. Use 62 for the Color Expansion (not Pattern Expansion - it's not divisible by 4) and you'll get this. As you can see, the pattern is controlled by the Expansion.
 This same sort of Expression can used for all weaves, no matter how complex you want them to be. Just choose the number of threads for each color, and then add them all together to Expand without a flip, or add the middle, double, and then add the ends to Expand with a flip.
 Naturally, you don't have to repeat the Warp in the Weft. You can use two different sequences of numbers, or different sets of colors, or anything you want to do.
For instance, here's a striped material, made by making all the Weft threads one color, while the Warp has six rows of ten threads each, and no flip. (You can make the Expansion for the Weft anything you want, when you do this. Just make sure that the Weft pattern is divisible by - you guessed it - four!)
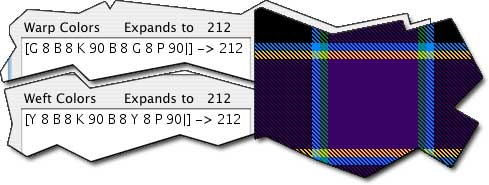
 Here's one based on a flannel shirt I happen to own, with different colors in the Warp and Weft.
(Green, the first Warp color, is replaced by Yellow as the first Weft color, and then replaced again after the Blue, BlacK, and Blue. So the Warp is Green 8 Blue 8 BlacK 90 Blue 8 Green 8 Purple 90. There's no flip, so the Expansion is 8 + 90 + 8 + 8 + 8 + 90 = 212.
 And here's one that has a completely different Color Pattern and Expansion on the Weft, to make rectangles. Can you read this Expression?
Click anywhere on this sentence to open a pop-up window, if you want to check yourself!
 I also find, since I'm mostly doing these as materials for use in 3D textures, that it helps to make the Weft colors different from the Warp colors. and then to choose colors that are slightly darker in Value to replace them, using Get Color Set, and Put Color Set, (as explained above.) This fakes the difference in light striking the threads from two different directions, as you can see here, and adds that little bit of realism, since it eliminates the areas of flat color.
The only limitation is that you can't have more than 26 colors, since each one is identified by a unique letter of the alphabet.
So that's that! I have a bonus package of finished weaves here, if you'd like to look, dissect, or otherwise play with them. They should download as soon as you click the link.
Have fun!