Lightwave UV Maps for UV Mapper Users - Lesson 3

This is the third part in a five part series about using the built-in Lightwave tools for UV Mapping, designed for people who are used to using UV Mapper. (If you haven't used UV Mapper, you can still use these tutorials, of course. You just won't understand the references to the other program.) If you haven't finished Lesson 1 or Lesson 2, I strongly suggest that you at least read them through before you start this one. I'm going to assume that you know the material from the first ones.

If you click on any of the pictures, you'll get a full size screen shot.

Finished render of project. This time, we are going to make a map for a book, complete with dust jacket. Since most book cover designs are copyrighted, we are going to use one that I happen to own the copyright for. It's called People of Pern.

If you would like to follow along, you will need to download POPBook.sit or POPBook.zip for the model, and POPImages.sit or POPImages.zip for the various maps.

Once you have downloaded them, load the model into Modeler, and set one of the viewports to UV Texture, as before.

As you may have guessed from the fact that there are two color images, we are going to use two different maps to texture this book. First, we are going to create the map for the book jacket. So load the POPJacket.jpg as the image, and we'll get started.

Reduce the contrast on the viewport which is showing the UV Map. Since we know that we're going to have to position things on this image, and it has large white areas, let's open the Display Options (d on the keyboard, or Modeler > Options > Display Options) and reduce the Contrast on the Backdrop for the Viewport where the Color Map is showing. This will make it easier to see the points and polys, while still letting us see the color texture.

Then create a new Texture map, of course.

As before, name your map something that will allow you to find it in a list of maps, say “POPJacket_UV”, and make sure that Initial Value is unchecked.

Finally, open the POPJacket surface in the Surface Editor, and assign the POPJacket_UV for the UV Map, and the POPJacket.jpg image as the color map. Now you will be able to see the map as you assign the UV values, as always.

Set up to make a new map, as usual, select the POP_Jacket surface, and hide everything else. Although it would be fairly simple to choose parts of the jacket and arrange them, as we did for the die, we are going to open it out instead, to take the endomorph mapping one step farther.

So, click on the M for morph in the lower right, and choose (new) once again. Name it something like Mapping, as we did before, and we'll start to unbend the cover. (If you are unsure how to do any of those things, please see the previous two lessons.)

Select the POP_Jacket surface, and tap the = (equals) key on the keyboard to hide everything else.

Click on the end flap polys, and expand the selection so it wraps around almost to the top. Make sure you are in Polygon selection mode, and that the Back view is showing in one of the viewports.

Select the 4 polygons that make up the last section of the book jacket flap that wraps around the top of the book by clicking on the polys in the Back view, and then typing } (right curly bracket) 5 times to extend the selection, just the way we did to get connecting polys for the Swoop Can.

Rotate the selected polys to straighten the flap. Zoom in on the boundary between the last polys selected and the unselected ones on the top. (Don't forget that you can zoom in by using the g key to center the spot right under the cursor, and then dragging the magnifying button to zoom.)

Make sure that the Mode (on the strip at the bottom of the window) is set to Action Center; Mouse (F5.)

Get the Rotate tool (y) and, carefully placing your mouse on the top point that is shared by the two sets of polys, rotate the selected ones so the first set lines up with the unselected ones. )

Continue until the whole flap is flat. When you have it, Contract the selection (left curly bracket - {- or Display > Selection > Contract) and rotate again so the next selected polys line up with these. Continue in this way until you have unwrapped the whole flap. If you need to, go back up the chain, using { (right curly bracket) or Display > Selection > Expand, and straighten out any kinks that you need to fix. (Perfection isn't necessary, as we can drag the points later; but getting close helps.)
Do the same thing to flatten the bottom flap. Repeat the process for the bottom book jacket flap. This time, you'll have to click on the } (right curly bracket) six times, though. And, of course, you'll have to rotate from the bottom of the poly, not the top.
Expand the selection to the points in the center of the spine, and flatten the whole jacket. (It will be vertical.) When both flaps are unfolded, select the end of the top flap again, and expand the selection until you reach the center point of the spine (13 }s ). Unfold the spine just the same way you unfolded the flap. (You'll have to begin by making the first section straight up and down, since there aren't any straight polys to match it to.) When you are done, start again from the end of the bottom flap.
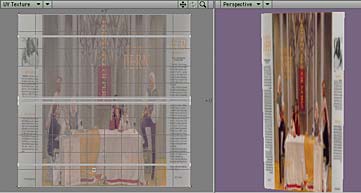
When it's completely unfolded, Make UVs. When you are finished, you should have the whole jacket unfolded, and hanging there vertically, ready to map. (I'm showing it in "Shaded Wireframe" mode so you can see the polys, just as I did in the large pictures above, in case you clicked on any of the small ones, and wondered.)

Just go to Map > Texture > Make UVs as always. Remember, this part is just like choosing “New UV Map” in UV Mapper. (There's nothing there to compare with the rest of what we've been doing, though.) Choose a Planar map, using the X axis, of course.

The image is mirrored on the model, so Flip UV Point Map. The UV Map Polys will appear on the picture in the UV Texture viewport, and at the same time, you will be able to see the image of the book jacket on the model. (If you can't, make sure that you are using Texture as your viewing mode.)

One glance there will show you that the map needs to be flipped; it's a mirror image of the Background picture. So go to Map > Texture > Flip UV Point Map, and choose Flip U (that flips right for left, as you probably remember.) That's better.

Switching to the (base) endomorph shows that the image is sideways. Switch back to Mapping to fix it. Now, using the M button at the bottom, switch back to the (base) model, so you can see how the image looks on the book. Ooops! It's sideways! We could just rotate it (either on the map, or rotate the model and Make UVs again,) but let's take a look at another tool, instead.

Switch back to the Mapping morph.

Go to Map>Texture>Transform UV, and Rotate 90°. Click on Map > Texture > Transform UV. The Transform UV Values requester will open. You can choose to offset, scale, rotate, or change the center of selected UVs here. Click the Rotate checkbox, and choose 90°. Click OK, and the model will look fine.

The map, on the other hand, has the polys hanging off the edge! That's because the maps wrap around, like an ancient video game. The points on the right hand side are actually adjacent to the points on the left, and the top and bottom meet, too. We need to put those polys back on the map, though, so they look better to us. After all, the computer might not mind; but we are reasonable facsimiles of human beings!

Go to Map>Texture>Transform UV again, and Offset 100% on the V axis. Click on the button to open the Transform UV Values requester again, uncheck Rotation, and Check Offset. Offset 100% V. (Remember, V is vertical.) That's better.

I'm sure that you can find lots of other ways that this little dialog will make your mapping life easier, experienced mappers that you are becoming.

Select each pair of points, and drag the polys that make the flap fold to the correct place on the map. Depending on how the jacket unfolded, you may need to drag some of the points around to make sure that the flaps fold where they should.

Go ahead and do that. Just switch to Point Selection, and use the lasso (right mouse button) to select all the points that make up the curve around the flap. Then, using Control/ctrl to restrain the movement, drag the whole set with the move tool (t) until the polys are over the correct part of the flap. (They should lie about where they do in the picture.)

Then picture is on both sides of the jacket! That's wrong. Check the (base) morph, to see how it looks. If it needs tweaking, you can do that, otherwise, it's time to finish up the Jacket map.

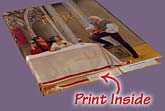
If you look at the inside surface of the jacket, you will see that the image is there, as well. That won't do; it should be plain white, not printed. It's easy to fix, although we are going to cheat just a bit.

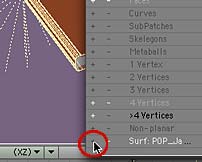
Scrub the mouse over the front of the cover in Polygon mode until nothing more lights up. Then hide the selected polys. Select the visible ones, cut and paste. Go back to the Mapping endomorph, hit F3 to select by Polygons, and select all the polys for the outside of the jacket by running the mouse over them in the Perspective window.

When you think you have them all, type the - (minus sign) key to hide them. Any that you missed will now be obvious. Select and hide them, too. (There should be 27 polys when you have them all.)

Select the visible polygons, either in a wireframe view or right on the map, cut them, and immediately paste them right back in. That will allow you to manipulate the points. (Remember, when you are setting up the maps with Lightwave's tools, a point can only be in one place on the map at a time. If you try to move the vertex the point is attached to, it will simply stretch.)

Click on an inside Poly and type ] to select them all.

Unhide the hidden polys by tapping the \ (backwards slash) key.

Notice that the whole book reappears now. Select the inside of the jacket by clicking on any poly that belongs to it in the Perspective view, and then tapping the ] (right bracket) key to select all the polys that are connected to that one.

Shrink the selected polys, and place them in a white area on the map. On the map, shrink those polys until you can put them all in the blank white space above the picture of the artist. (I told you we were going to cheat.)

That will make the inside of the jacket white, without using any more memory for a larger map.

The Jacket is done. And there's the jacket, perfectly mapped. Now, of course, we might have been able to do the same job with less work by not unwrapping it. But I wanted to show you how that's done. The knowledge is likely to come in handy.

So, let's go to Page 2, and map the book itself.

If you have a question, write to me and ask it!

Everything on this site is copyright © Robin Wood; all rights reserved. Please do not use anything without permission. To get permission, write to Robin, and explain what you intend to use it for.