Note: I haven't used Bryce in years; so these tutorials are archived "as is." I can't accept questions, because I don't remember the answers.
This is page 2. If you haven't finished page 2, please do so before starting this page.
 Ready to put the arch on a pillar? Good.
Create another Cube, and call it Pillar Top. Size it so that the Y dimension of the fourth cylinder (the innermost visible one) is its X dimension. That way, the width will match the width of the arch. (Remember, the cylinders that make up the arch are all rotated -90°.)
Give it a Y of 5 B, and a Z of 10 B.
 Align the Arch Group and the Pillar Top on all three axes.
Switch to Front view, constrain the movement to the Y axis by holding down Option/Alt, and drag the Pillar Top up so that the top meets the apparent base of the arch. (You might find it easier to do this if you lock the Arch first. Not only will you not be able to accidentally select and move it, the colors will be dimmed so you can see the Pillar Top more easily.)
 Toggle to either side view, hold down the Z key to constrain the motion to the Z axis, and place the midpoint of the Pillar Top on the outer edge of the Arch group.
Hold down Option/Alt to resize from the middle, and drag the Z axis handle until it fits the arch.
 Multi-Replicate 3 copies, for four cubes total, resizing them on the Y axis about 200%. (You will be adjusting this by eye later, so it's not critical. You just need them separate enough that you can tell which is which.)
In front view, hold down Option/Alt to resize them from the center, and resize each cube on the Y and Z axes so that the edge just meets the edge of the appropriate hoop, and the spacing looks right you.
 Go to the Front view, and select each hoop, copying the size in its Y axis to the X size of the appropriate cube. (The topmost cube will actually be matched to the Top cube from the Arch Group, of course.) When you are finished, the cubes should match the hoops perfectly, stair stepping in a pleasing fashion.
Change the Family Color of the Pillar cubes so they match the family colors of the hoops, if you want to be able to select both parts of the decorative elements at once.
 Group these cubes, and name the group Pillar Group. Group the Pillar Group with the Arch Group, and name the group Aqueduct Segment.
Raise them on the Y axis as high as you want your aqueduct to be.
Finally, grab the bottom Y control handle of the central cube (Pillar Top 3,) and pull it down on the Y axis to touch the ground.
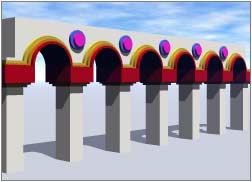
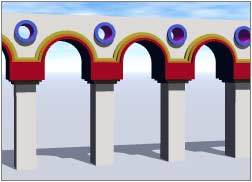
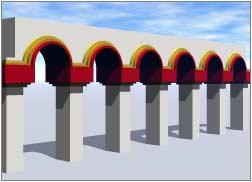 To actually construct the Aqueduct, just select the Aqueduct Segment group, and Multi-Replicate 4 or 5 copies, offset 25 B along the Z axis. Presto! A line of arches that form a lovely Aqueduct, breezeway, or what-have-you. Select the last pillar in the group, and make a single Multi-Replicated copy, offset 25 B on the Z axis, to support the last arch.
Group the whole thing, and name it Aqueduct Group.
 |
 |
Looks great, yes? But what if you decided at this point that you wanted to add another detail to the space between each arch? Let's take a look.
Create another cylinder, name it Pigeon Hole, rotate it 90° on the Z axis, and drag it up so that the midpoint is on the line between the first two Top cubes. Resize it from the center until you like the way it looks. (I recommend that you do this while in one of the Side views.) Switch to the Top view, and pull out the sides until they are about as far out as the outermost arch.
 When you like it, select the Aqueduct group and the new cylinder, and align them on the X axis.
Select just the Pigeon Hole cylinder, and duplicate it. Resize the duplicate to taste, and pull it out along the X axis so that it protrudes from either side of the aqueduct. It's going to be the negative boolean that will drill the hole between the arches. Give it a different family color, again.
 Select both Pigeon Hole cylinders, and Group them. Name the group Pigeon Hole Group. Multi-replicate enough copies to go between the arches, offset (you guessed it) 25 B on the Z axis.
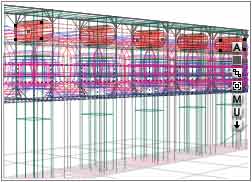 Okay. Now we need to make Booleans out of these, and we want them to go the whole way through the Aqueduct.
So ungroup them all, and select just the inner cylinders by using the Selection Palette and selecting by family. (Good thing you gave them a family, huh?)
Group them, call the group Pigeon Hole Drills, and give it a negative boolean.
Select all of the outside Pigeon Hole cylinders, and give them Positive booleans.
While they are still selected, select the Aqueduct Group as well, and group the Pigeon Holes with the Aqueduct. Call the new group Holy Aqueduct, and give it a positive boolean. Group Pigeon Hole Drills group with the Holy Aqueduct group. What happens?
Nothing.
Why not? Because Bryce calculates nested booleans from the inside out. It looks at the innermost group first, and calculates the boolean from that. It takes that answer, and calculates the next one using that as the part, and so on. It keeps going until it gets to the top level, and then it renders.
If you are going to make a group into a boolean, everything in that group must, itself, have a boolean property other than Neutral, or the boolean won't work.
 So let's try this again. You don't have to ungroup anything. Just select all the inner cylinders again, using the Color Family, and change the boolean to Positive, making a Boolean Union of the group.
That may not, at first glance, make a great deal of sense. But it does if you think about it for a moment. Bryce calculates nested booleans from the inside out. We want it to think of these as a single piece that Bryce is removing from the arches; so they need to be a union to make that single piece.
Now try it. Well, we got through the first ring, where the Pigeon Holes had Positive boolean properties. But we didn't go through the arches.
Do you know why?
 Because all the members of any nested boolean groups must have boolean properties.
The Arch Groups don't, the Aqueduct Segment groups don't, and the Aqueduct group doesn't. Select each of these groups, and give them all Positive boolean attributes. (It's easiest to select them from the Group menu under the flippy on the Selection Palette. Just hold down the sift key, and go down the list. When you have all of them selected, you can change the boolean for everything in one go.)
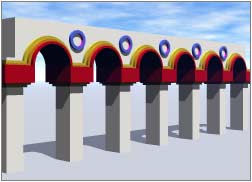
Now try again. Ah! Blue sky at last.
They always work like that. Whenever you try to make a boolean group, and nothing happens, look at all the members of the group to see which ones don't have boolean properties. Assign them, and it will all work as it should.
(Note that in this case, the cubes that make up the pillars, and the Pillar Groups themselves, still don't have boolean properties. But then, none of the booleans are affecting them. If you decided to replicate pigeon holes in the pillars, you would have to fix that.)
 One more quick one, just for practice. We are going to make a Box with a View.
Create a box, duplicate it, and shrink the duplicate so it fits inside. Give the inner box a Negative boolean, obviously, and the outer one a Positive boolean. Group them. Call it Box.
 Create another cube, resize it and stick it in the side of the box, to make a window frame. Give it a positive boolean, and name it Frame.
 Create another cube, name it Window Pane, and size it so that it will take four of them to neatly fill the Frame. Give it a Positive boolean, duplicate it, and make those four. Group them. Name the group Window Panes.
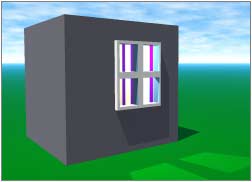 Give the Window Panes group a negative boolean, and group it with the house and frame. Put a light in, so you can see how you did.
Simple, isn't it? Add the boolean properties as you go along, and you won't ever run into troubles.
You can add onto this if you want to, or you can move on to the next thing.
 |
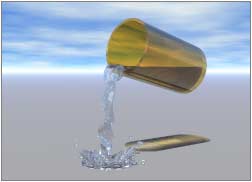 |
Last week, we did quite a lot with water. But there were a couple of things that there just wasn't time for. The first one was pouring water.
There are two ways I know of to make pouring water in Bryce. The first is relatively new, the second we have been using for years.
Grab a glass, any glass, or make one if you don't have one handy. You should be able to boolean one out in a couple of seconds at this point. To make the water pouring out, just use metaballs!
Keep them small, and make the sizes pretty random. Glob them together the way that falling water globs, and you should be able to get a pretty good flow. If the glass is transparent, you can also put some water leading up to the edge exactly the same way you did the Ginger Brew bottle in the second lesson.
You can use metaballs again for the splash where the water lands. Water splashes are surprisingly symmetrical, so use Multi-Replicate to get the drops flying out at roughly the same angle; then tweak it so that it's not too symmetrical.
 |
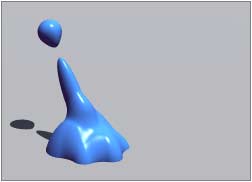 |
Let's do one, just to explain what I mean. Create a metaball, and shrink it down, then pull it out on the Y axis, and smash it in farther on the Z and X. Rotate it about 30° or so on the X axis. (Remember, you can see how far you are rotating by looking in the text area while you use the tools.)
Create another, and put it just off the end of the first one. That will be the separate drop from the splash. How separate it is will depend on how far you remove it from the first part, remember.
Now make several more, and pile them up around the bottom, to form the base of the splash. When it looks good to you, select all the metaballs, and group them.
 |
 |
Open the Object Attributes of the group, and enable Show Origin Handle. Pull the handle out to what will become the center point of your drop.
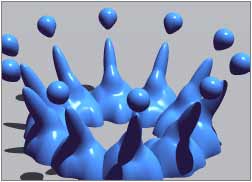
Multi-Replicate 9 copies, rotated 36° on the Y axis, to make a coronet of 10 droplets.
 |
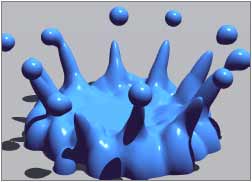 |
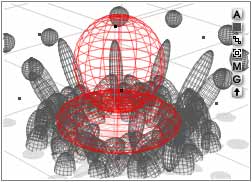
Ungroup all the groups, so the metaballs can interact. Tweak it by moving the individual metaballs around. (You can use just the tiniest bit of 3D Disperse, Size, Rotate if you want; but be careful with it.)
Finally, if you think it needs it, make a negative metaball by holding down the Shift key while you create a new metaball, and place it in the center. Group the whole splash, to keep it from affecting the water dropping into it.
In the illustration above, I added one flat metaball to act as the center of the droplet, and a negative one to hollow that center out.
You can achieve some very realistic effects this way; but it takes a lot of patience. For reference, you might want to examine some high speed photos of water falling. (I recommend Stephen Dalton's books of high speed photography; they are amazing.)
 |
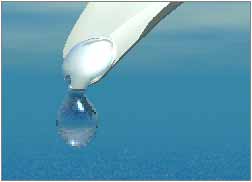 |
You can also use metaballs to make very effective single drops of water, and things of that nature.
Go on to Page 4, and we'll take a look at the old method of pouring water, and a nice driving rain.