Lightwave UV Maps for UV Mapper Users - Lesson 3 page 2

This is the second page of the third lesson. If you haven't finished the first page, you'll find it here.

Once again, if you click on any of the pictures, you'll get a full size screen shot.

Make a second Texture map, called POPBook_UV. Select the Jacket, and hide it. Load the object into Modeler, and set your window up so you have four viewports. Choose UV Texture for the top left Viewport.

Select the POP_Jacket surface, and hide it.

Stretched polys at the ends of the book. Select the front cover of the book by clicking on the large poly in the Perspective view. Then tap the } (right curly bracket) key twice to get the whole front book cover. Cut and Paste right back in, as usual.

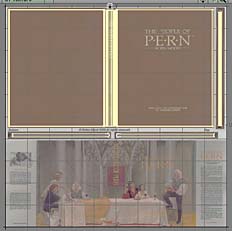
Now, before you do any more, look at the picture. I've gone ahead and put the texture on it to show you something.

See how the image on the highlighted poly is just lines, not the faux leather of the rest of the book cover? The map is "stretched" there, because the poly is flat up and down. The only part of the picture that it's getting is the single row of pixels that touch the line it makes on the map.

Select the end poly, and rotate it up. To fix it, make sure your are working in the Mapping morph, select both of those polys in turn, and rotate them 90°, so they line up with the flat cover, just as we did for the jacket.

Then select the whole front cover, and Make UVs. There will be polys that overlap in the corners, but that won't be a problem, since the texture there is supposed to be virtually the same. (If it bothers you, you can cut, paste, and arrange them however you like on your map, of course. There will also be some stretching along the right edge of the cover; but it's not going to be as bad, and we are going to ignore it this time, since it won't be easy to see.)

Resize and position the polys on the map, as usual.

Map the back cover the same way. Select the back cover. Cut, Paste, and Map it exactly the same way, rotating the end polys down this time, instead of up.

You will need to flip it, of course.

You can tell, because the mapping is always done with the right side facing the positive side of the zero point. Since the right side of the back cover faces the negative side, any words there would be mirrored, and the seam where it meets the spine is on the wrong side of the book. (If you are looking at the texture in the Perspective viewport, this will be obvious.)

You won't see much difference with this image; but you may want to use a different image some day. Best to have the map able to support it.

Hide the covers, and uncurl the spine. When you have finished both covers, let's take a look at the spine.

As you can see, it curves around the book. If you just select the polys and Make UVs, you will get stretching on the sides of it.

So, select and hide the front and back cover, make sure that you are working in the Mapping morph, and "uncurl" it, exactly like you did with the jacket. I'm sure you know how, by now, so I'm leaving you on your own for that part.

Make UVs for the spine, flip, rotate and positon them, centering them on the book. When it's ready, select it by clicking on a poly, and then tapping the ] (right bracket) key to select all the polys that are connected to that one. Since the front and back covers have already been cut and pasted, only the spine polys are left.

Make UVs again, flipping and rotating as necessary. (You might find this easier to do if you uncheck Show Polygon Selection in the Display Options for the viewport you are checking the texture in. You might also want to check the placement in the (base) morph. Remember, it's not important if the polys look centered on the map; only if they look centered on the model!)

Make the UVs for the pages, top and bottom. Finally, select the three page ends, one at a time, and Make UVs for them, choosing Planar Mapping on the appropriate axis each time. Cut and paste, Flip UV Point Map, resize and rotate them as needed, and place them over the appropriate page edge on the map. (Don't forget; they will need to be flipped if the surface faces the negative side of the zero point. They won't if it faces the positive side.)

The top and bottom are each a single polygon, so that should make it easier. Do them first.

Select Connected to get the side pages, and all the rest of the Page polys. Map as usual. Select a poly, and then Select Connected to pick up the side pages. When you do, you will notice that there are polys on the top and bottom too, and they are also selected. This is because I originally made this book so the front cover could be opened. (That's why the jacket wrapped around it.) If you want to go ahead and map it so that it can, feel free. You can do that part as practice on your own.'

Otherwise, just Map the UVs, as we've done so many times before.

To use the Jacket and book separately in Layout, put the Jacket on a different layer, with the book as its Parent. Delete the Mapping morph, and merge points to finish it up.

And there you have it!

If you want to be able to render it easily without the cover, put the jacket in another layer, and parent that layer to the book.

In that case, you'll probably want the POPBookBump.jpg and POPBookSpec.jpg images, too. Put the POPBookSpec.jpg map in the Diffuse, Specularity, and Reflection channels of the POPBook surface, (inverting it for the last two,) and you should have shiny gold lettering on your book.

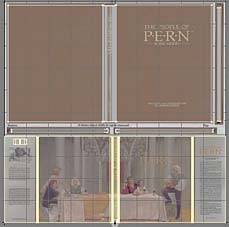
Open the Vertex Maps requester, and copy the POPBook_UV map. Okay. The book is mapped on two separate maps, and it's looking great in Layout, and you are very pleased.

But now, supposing that a friend of yours sees it, and wants to use the model in Bryce. You agree, but when she sees that it's on two maps, she asks if you can please make it a single map; she doesn't need high resolution, and applying two maps in Bryce is a pain.

Combining the two pictures in Photoshop is easy; but you don't want to have to redo all your hard mapping.

Well, the good news is that you don't have to. You can copy and paste the UVs from one map onto any other.

First, let's copy the POPBook UV map. Click and hold on the Modeler button on the toolbar, and choose Windows > Vertex Maps Open/Close from the fly out menu (exactly as we do to Delete the Mapping Morph.)

Open the flippy next to Texture to see the maps that you currently have available. Pick POPBook_UV from the list, and hold down the right mouse button (or Command+mouse button if you are still using a one-button mouse on a Mac) to access the contextual menu. Choose Copy Vertex Map from the list, and name the copy something like POPCombo_UV. (Don't forget to save this model with a different name.)

Change everything around to use these maps. Then select the cover and pages, and Unweld the points. Open the Surface Editor, and change the UV Maps and Images used for the surfaces, so you can see what you're doing.

Select the polys right on the map, go to Detail > Points > Unweld (so every poly has enough points to be moved on the map.)

Constrain movement, and drag the polys up to fit the new image. Then hold down Control/ctrl to constrain movement, and simply resize them to fit on your new image!

(We unwelded everything this time, because it's easier if we don't need to select anything.)

Switch to the POPJacket_UV map, and Copy UVs. Select the POP_Jacket Surface and switch to the POPJacket_UV map. (The active map can be found in the buttons at the lower right corner of the screen.)

Go to Map > Texture > Copy UVs. The polys will become unselected as their UVs are read into memory. When it's finished, switch back to the POPCombo_UV map.

Paste UVs, and resize the polys on the map. Select the POP_Jacket surface again, and then click Map > Texture > Paste UVs.

Select the POP_Jacket surface one last time, and resize the polys on your map so they fit the new picture you made.

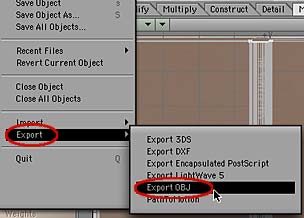
Export OBJ from the File menu. Put everything back on the same layer, go to the File menu, and Export the newly mapped model as an .obj file so your friend can use it in Bryce. (If you want to be really friendly, you can put the POP_Binding_Tape surface somewhere on the map, and make it all one surface, like we did for the die.)

And that's all there is to that!

(If you want the Combo maps, you can download them in sit or zip format.)

So, you've had lots of practice unfolding things in an endomorph, and more practice making maps in general. If you feel ready for more, go to Lesson 4 and we'll map a very complex model of a Vambrace (armor for the arm.)

If you have a question, write to me and ask it!

Everything on this site is copyright © Robin Wood; all rights reserved. Please do not use anything without permission. To get permission, write to Robin, and explain what you intend to use it for.