As you remember, our lights were plain, boring white; and we were going to fix that.
Click on the Fill light to select it, and then tap the p key (or choose Properties from the Current Item area) to open the Properties Panel for that light.
You can see the light's name in the Current Light field, followed by the Light Color requester. Click on the swatch to open your system's color picker, and choose a cool color for the light.
Click on the triangle next to the name of the Current Light, and you'll see a menu that allows you to choose any light in your scene. Pick Light, which is our Key light, and give it a warm color.
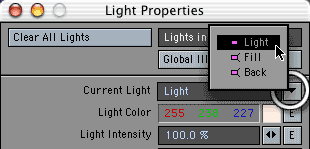
Choose Back from the list, and let's change its intensity to 150%. Just type the new number into the Light Intensity field. You can push the lights in LightWave way past 100%, (or even give them negative values, so they cast pools of darkness.)
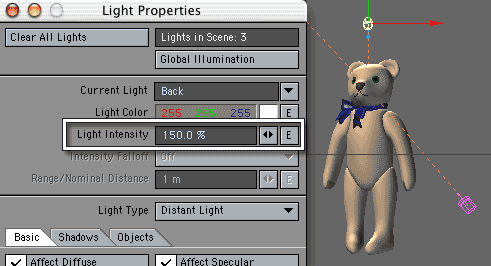
You can change many other properties of the lights here, too; but that's info for another tutorial. For now, let's set up the Camera, instead.
Leave the panel open, and tap C (Shift+C) on your keyboard (or click on the Cameras button in the Current Item area.) The panel will change from Light Properties to Camera Properties. You never have to close the panel when moving from one type of thing to another. LightWave knows what to show you.

There's one default value here that needs to be fixed. It's called Segment Memory Limit, and it tells LightWave how much RAM it can use while rendering. The default, 32 MB, is way too low. If it's not changed, then even simple renders, like this one, may be split in half and rendered in two pieces, which takes extra time. So first, we're going to fix that. (This will only need to be done this one time.)
Click the teal button labeled Segment Memory Limit near the bottom of the first section.
This opens a panel that allows you to change the number. I use 100 MB, which seems to be large enough to render most scenes in a single segment. If you have more memory, or know your scenes are going to be unusually complex, you can set it higher of course.

Click OK to close the panel and accept the new limit. A panel will open that asks if you want to make the new number the default. Say Yes, so you won't have to do this again, (unless your needs change for some reason.)

Take a look at your object in the Camera Viewport. It's probably too far away, leaving too much empty space all around it, isn't it? Let's fix that next. See where it says Zoom Factor? To the right of that are two little arrows that are facing away from each other. These are the spinners. They are found throughout LightWave, and are one of the many things I really like about the program. Put your cursor on them, and drag to the right. It's just like using a zoom lens, huh?
(By the way, if you need to match the Focal Length, Aperture Height, or Field Of View of a real lens, you can do that, too. But this is fine for our purposes at the moment.)
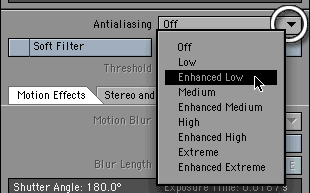
The other thing we should set while we're here is Antialiasing. That's to prevent jaggies, of course. In LightWave, each additional level of AA adds an additional number of passes to the render. These take extra time, naturally, so we don't want any more than we need.
Enhanced Low, which takes 5 passes, is enough for most things. The extra levels are for special effects, like motion blur. If you aren't using them (and we aren't, since nothing is moving,) don't use 'em.
And that's that for the Camera. Close the Properties panel. It's time to set the Render Options!
Click on the Render tab, and then on the Options: Render Options button.
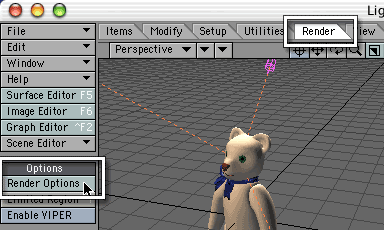
That will open the Render Options panel.
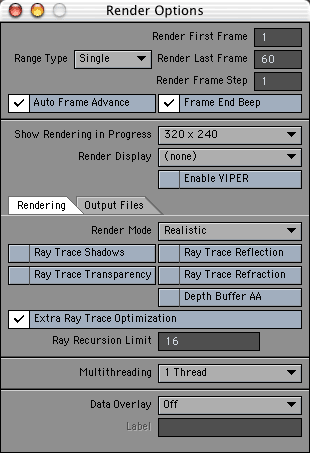
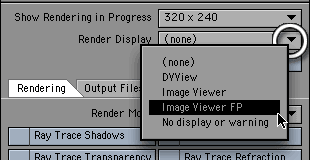
There is one really important thing we need to fix here, before we can render. If you haven't changed the settings, you'll notice that the Render Display (second section, second line) is set to (none). This needs to be changed, If it's not, LightWave will discard the render as soon as it's completed. (So, I'm afraid, if you've been rendering things and can't find them, you can stop looking. They're gone. Sigh.)
Change this to Image Viewer FP. The FP stands for Floating Point. LightWave makes what are known as High Dynamic Range Images (HDRI), but it will discard the extra information if you choose a different Render Display. Since you can do all kinds of things with that extra information, it's good to keep it.
Leave the rest of these very interesting things at their defaults, and close the panel. We're ready to roll!
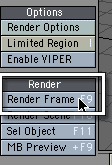
Tap F9, or go to Render > Render; Render Frame. And watch it go!
What you are looking at now is the Render Status panel. It tells you all kinds of things, including how many passes are left to render. When it's finished, it will tell you the rendering time (always interesting,) and the Continue button will become available on the right, above the picture. Click it.
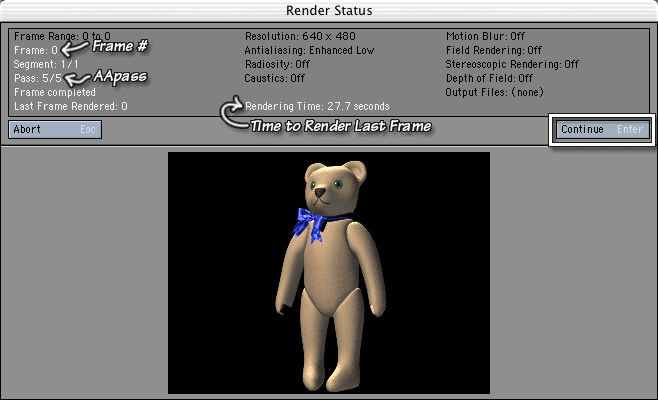
And there's your render! Would you like to save it? It's easy. Just go to the File button at the far left corner, and choose Save RGBA from the drop-down menu there. That opens a whole list of file formats.
Just pick the one you prefer. (By the way, LightWave automatically renders an alpha channel, every time. That's what the A in RGBA stands for. If you want to keep it, make sure that you choose a format like LW_PShop32(.psd), LW_PNG32(.png), or something else that saves alpha channels.)
As soon as you select a format, a normal Save dialog for your system will open. Choose the location and name for the file, as you usually do, and you're done! You've rendered, and saved, an image from LightWave. (And not a bad one, either!)
(Incidentally, in case you're wondering, I moved the bear a bit in Photoshop so you could see it behind the menus.)
Of course, this is only scratching the surface of what you can do. We didn't begin to explore the different kinds of lights, or camera properties. We didn't set up the render to use cast shadows of any kind, or reflections, or refractions, or anything. We never considered half the things in the Render Options dialog. We never discussed the three kinds of Render Displays, and why you might use one instead of another. We never looked at most of the things you can do with Image Viewer FP. We never even mentioned rendering an animation! There just wasn't room. All of those things will have to wait for other tutorials.
For now, though, feel free to experiment on your own, knowing that if you do something cool, you can render and save it!
Until next time!