Putting water into a glass using MetaCreations Infini-D.
Begin by starting a new object (I usually use "the glass") and entering the workshop.
 |
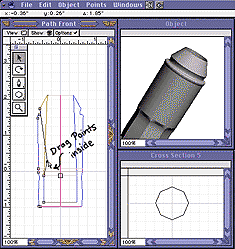
In the workshop, choose the "Lathe Cross Section" Layout to get the arrangement shown here.
Here you can see the rails, the path, and the cross section marker, which makes cross sections, as well as the actual cross section for the point marked.
The problem is that when you draw a complete container, the path folds along itself, and the points on the folded portion are not available to make cross sections. This would mean that the cross section could only change on the outside of the glass! The inside would have to have the same cross section for it's entire length, and wouldn't match the outside. |
 |
The solution I have found is to continue the rail beyond where it should fold over to become the inside, making sure that you put enough points on it to contain all the cross sections that you will need.
It then becomes a simple matter to choose those points on the path, and insert the necessary cross sections. |
 |
When you are finished, drag those points on the rail down into the "inside" wall of the glass, and place them where they are needed. |
 |
Then adjust the control handles, and line the points up correctly (adding additional points if necessary) until you have the inside wall built to your satisfaction.
At this point, add endcaps if required.
And there is your finished container, ready for contents!
Exit the workshop. |
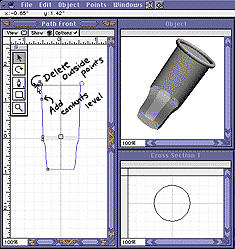 |
In any window, select the container, copy and paste. This gives you a duplicate container in exactly the same position as the first one. This step is crucial! Rename the container, to avoid confusion, and enter the workshop.
There, add a new point to the inside rail. This will be the level of the contents.
Then simply delete the points that make the rail for the outside wall of the container, leaving only the portion of the inside rail that will be the contents. |
 |
Now you have a new problem.
If you look at the object in the shaded mode, you will find that somehow the faces have been turned inside out!
This won't do. Volumes of liquid are very seldom inside out in the real world!
Besides, it messes up all of the refractions, reflections, and shadows. |
 |
Fortunately, it's easy to fix.
Go to the "Object" menu in the main menu bar (not the window menu bar) and choose "Reverse Path Direction" from the bottom of the menu.
This turns the contents right side out.
Exit the workshop. Leaving the contents selected, make them slightly larger than the container. (If you don't, you sometimes get gaps between the edges, which gives you an unpleasant effect.)
That's it! Your container and contents are ready to go.
All that is left to do now is shading and rendering. |
Hints:
 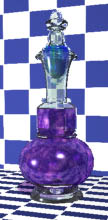 |
Use the template feature to make complicated containers, like the double potion bottle pictured here.
You can also use the template to make the contents of a container, and in some cases (very complex cross sections, for instance) that may work better.
But you have to draw the template first; and that's usually more work than you have to do! |
| You can use these same techniques for solid contents, of course, as I did for the salt and pepper shakers in the title picture.
I didn't want a plain level surface for them, though, so I used a sphere as a Negative Boolean to get the inside surface.
Negative Booleans are also an elegant solution to get a decreasing level in an animation, or a slanted level in a tilted container, as shown below. Combining these, you can get liquid to "slosh" quite convincingly! |
 |
If you have a question, write to me and ask it!
Everything on this site is copyright © Robin Wood; all rights reserved. Please do not use anything without permission. To get permission, write to Robin, and explain what you intend to use it for.