Putting a Decal on Glass (or anything else) in LightWave

This tutorial was written for Lightwave 8. There are files available for you to download if you would like; but they are not required to complete the tutorial. Most of the images are shown fairly small, to ease download time. If you would like to see them full-size, just click on the picture.

If you have followed the last several tutorials on Transparent Surfaces in LightWave, you should be pretty comfortable with making them. But what happens when an object has something like a decal or label that overlies the transparency?

We'll explore what to do then using a shot glass. If you want to download it, along with the image files I used, you'll find a .zip file here, and a .sit file here.

The first thing you'll need to do is prepare the decal (or label) in your graphics program. For this tutorial, I'll be using Photoshop CS; but you can use whatever program you like, of course.

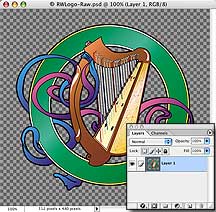
Open the image in your Graphics Program. Open the file called RWLogo-Raw.psd. (If you cannot open it in your program, then I recommend that you use one of your own images. In fact, you might want to do that anyway. It's more fun to see your own picture as a decal, after all!)

As you can see, this image is a single layer, with a transparent background. You might want to set your own image up the same way.

make the Image a square by matching the largest dimension. The first thing we need to do is make it into a square. This will aid in scaling later, when we're using LightWave. So, go to Image > Canvas size, notice which dimension is the largest, and type that value into the text field for the other dimension. (In this case, we'll change the Height from 480 to 512 pixels.)
Make a new layer, and fill it with 100% Black Now we need to make an Alpha layer, to use in LightWave. We're doing this as a separate layer, instead of simply saving a 32 bit Targa file, because we'll be using the black and white image in several different channels.

In a LightWave alpha channel, the pixels you want to hold the image must be white, and the ones that you want to “disappear” must be black.

So, tap d on the keyboard to change the colors to the default Black and White. (Pixels won't disappear completely unless the alpha is completely, 100% black, and this is the easiest way. Never trust your vision to tell you what is black, and what's 99.9% gray.) Make a new layer, hold down the Option/alt key, and tap Delete to fill it completely with the black foreground color.

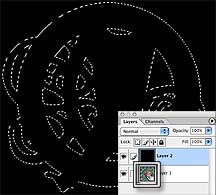
With layer 2 active, select the Non-Transparent pixels in Layer 1 Hold down Command/ctrl and click on the thumbnail of the image layer in the Layers palette to select the non-transparent pixels.
Expand the Selection to get a border around the Decal If you want a white border around the decal, as shown here, go to Select > Modify > Expand, and choose how many pixels you would like as a border. I used 4 in this example.
Fill with White make the Alpha Channel image Then hold down Command/ctrl, and tap Delete once more to fill the selected area with the background color, which is now white. You've made your alpha channel!

Save each layer of the image separately, in your favorite format, and we're ready to move to LightWave.

In Modeler, select the Polys where the Decal will be. In Modeler, load the Object. If you are using mine, that's RWShotGlass.lwo. I've already made the Air Surface polys. If you are using your own object, it's easiest to go ahead and do that now, before you add the decal.

We are going to use Planar Projection for the Decal, so we don't have to worry about distortion on a subpatched object (like this glass.) As you know, Planar Projection goes right through the object, and we don't really want a reversed decal on the opposite side.

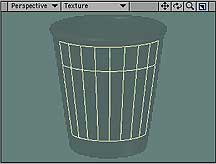
So the first thing to do is to isolate the polys that the decal will be on. Do that, either by using the Perspective view, or by hiding the Air polys, and using the Right orthogonal view. (Remember that you can hide the air polys by using the Surface line of the Polygon Statistics panel. See the earlier tutorials, if you don't know what I'm talking about.)

Change the Surface of those polys Give those polys a new surface (tap the q key). Call it ShotGlassDecal, or something like that.
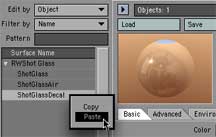
Copy the Glass (base) surface and Paste it into the new (decal) surface. In the Surface Editor (F5), right click on the ShotGlass surface, Copy it, and Paste it into the ShotGlassDecal surface.
Change the values in the Diffuse and Transparency channels, so you can see what you're doing. That will make the two surfaces match perfectly, which is what you want. But it will also make it very difficult to see the decal while you are scaling and positioning it. So, for now, temporarily change the Diffuse value to 100%, and the Transparency value to 0%.

(Ordinarily, Glass has low Diffuse and high Transparency values. If you're putting the decal on some other kind of material, of course, this step might not be necessary.)

Click the T in the Color Channel to open its Texture Editor Now we're ready to make the magic! Click on the T in the Color channel to open the Texture Editor panel for that channel.
Check the Settings; Image Map, Planar Projection, and Axis Make sure Image Map is chosen as the Layer Type, and Planar for Projection. (They're the defaults, so they should be there.)

Choose the correct texture axis, so the image will be projected squarely onto the polygons (Z in this case.)

Set the Tiling to Reset, to keep it from tiling multiple times. Then load the Color image, in the normal way. (If you're using mine, that's RWLogoDecal.jpg.) Set both Width Tile and Height Tile to Reset, and you should see your image, just once, on the glass.

However, it's probably not the right size, or in the right place. (In fact, it might be mostly off the glass, like it is here, with only a tiny bit showing.)

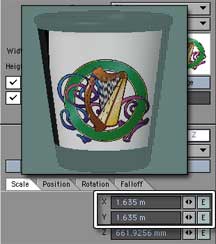
Use Automatic Sizing to center the image well enough to see, then use the spinners to tweak the Width. You can click on Automatic Sizing to get a close approximation, then use the spinners under the Scale tab to set the desired Width, which is the X axis in this case.

I'm using 1.695 m. (It's a pretty big glass! <g>. All right, all right. I didn't build it to scale.)

When it's good, type the same numbers into the Y (Height) field. When you're happy with it, change the numbers in the Y text field to match. (Now you know why we made the image square in the first place!)
Finally, Postion the image. Click on the Position tab, and use the Spinners again to slide the image to wherever you want it on the glass.

And there you go! The placement is good, but it's still a square label, not a decal. If you render now, you won't see glass around the edges of the image.

Duplicate this layer, to preserve the settings, load the Alpha map, and use Alpha Blending Mode. So, Copy this layer, using the buttons at the far right above the Layer Stack, and Paste it, using Add to Layers. That will preserve the settings for the image. Since the Alpha matches the Color perfectly, that will ensure that it's in the right place.

Load the Alpha image you prepared, (RWLogoDecalAlpha.jpg for mine), and set the Blending Mode to Alpha.

In LightWave, Alpha Blending Mode affects only the layer directly below the Alpha layer, so make sure the Alpha is on the top. Anywhere there are white pixels in the Alpha image, whatever is on the layer below will be used. Anywhere there are black pixels, the layer below will be completely ignored. Grey pixels, of course, will blend between the two, in proportion to the percentage of grey.

This can be used to get some amazing effects. Here, of course, we're just using it to trim the edges away from the Decal.

Copy the Alpha layer, and Paste it into the Diffuse channel's Texture Editor. So much for the color channel. But, if you look at a glass with a decal on it, you'll notice that much more than the color channel is affected by the decal. Diffuse, Specularity, Transparency, perhaps even Bump are all different for that little patch of paint.

So, Copy the Alpha layer, and, without closing the Texture Editor, click on the T in the Diffuse channel. You'll notice that the title of the Texture Editor changes, and it's now empty. You can save a lot of time by not closing it between each channel!

Paste the Alpha texture in, using Replace All Layers if you don't already have a texture here, and Add to Layers if you do.

Add a new Procedural Value layer. Okay, we're now using an alpha mask here, that perfectly matches the alpha mask we used in the Color Channel. But we need a layer for the mask to act on. What we need to do, really, is set a different Value for the Diffuse Channel on the decal.

So, add a new Procedural layer, and choose Value from the Procedural Type Drop Down Menu.

Type in the Value for the Decal's Diffuse Channel Type in the Value you want for the Diffuse Channel of the Decal. In this case, I'm using 100%, so it will react to light like a painted surface (which is what it's supposed to be, after all.)
Drag the Value layer below the Alpha layer, so the Alpha will mask it. Finally, drag the Value layer below the Alpha layer in the Layers stack. Remember, the Alpha will only act on the layer directly below it, so it's pretty much got to go there.

That's all it takes to change the Diffuse value of the Decal to 100%, while leaving the Diffuse value of the Glass itself untouched!

Copy the Alpha pair into the Transparency channel's Texture Editor. Copy both of these layers (Copy > All Layers, or shift click and Copy > Selected Layer(s) ) and click on the Texture button for the Transparency channel.

Paste them in, Replacing All Layers if there's nothing here, and Adding to the stack if there is.

Change the Texture Value percentage in the Value Layer. This time, all you need to do is change the value in the Value layer. Type 0% in the text field, and your decal will be completely opaque.
Change any other channels you think appropriate, render, and admire your Glass. Easy, huh? Repeat this procedure for any channel where you want the values of the decal to differ from those of the glass. In mine, I changed the Specularity value to 50%, the Glossiness to 40%, the Reflection to 5%, and the Translucency to 7%.

One of the chief advantages of using Alpha channels like this is that you can tweak all of these values on the fly, both for the glass and the decal, to get just the effect you want.

For the final step, change the Diffuse and Transparency Channel values back to whatever they were for the rest of the Glass. You'll notice that it's really hard to see the decal placement now; but you don't need to, so that's all right.

Send the object to Layout, tap F9 to render, and you'll see the decal stuck right on the side of the glass. Pretty slick, huh? (In this render, I added a fill light, and used Ray Trace Refraction, Enhanced Low AntiAliasing., and the default Gradient Background.)

Select the corresponding decal polys in the Air surface. Now, if you really want realism, and the glass is going to be seen from the side or back, as well as the front, there is one more thing that you might want to do.

Select the Air polys, using Polygon Statistics, and isolate them by tapping the = key to hide all unselected polys. Drop the selection, (/) and then select the same polys you used for the Decal surface. This time, though, call them ShotGlassAirDecal, or something like that.

Change the image to plain white. It will retain the shape, because of the Alpha channel. Copy the ShotGlassDecal surface, and Paste it onto the ShotGlassAirDecal, just the way we copied and pasted the glass surface onto the new decal surface earlier.

Then, open the Texture Editor for the Color channel, and change the Image Layer of the decal (not the Alpha) to a Procedural Value. Choose White as the color for that value, and the back of the decal will look plain white, just as it does on a real shot glass. (Of course, you can also use a different image here, if you prefer.)

Change the Refraction Channel value to 1.0, and render. Change any other values you want to change, just as you did before.

Finally, change the value in the Refraction Channel to 1.0, because it's an Air poly, and the glass outside the edges of the Decal needs to change the Refraction.

Now render, and admire the highly realistic decal you've created; with color on the front, and white on the back.

And that's all there is to it! You can use the same procedure to put decals on any kind of surface you desire, of course, not just glass. And you can use it to make things like gold decals, not just colored ones. All you have to do is tweak the values in those channels.

You can even use other textures below the Alpha in the other channels, not just plain values, to get decals that are dirty, or have a bump.

You can stack Alpha layers, so one will mask the one below it. And, of course, you can use several different Alpha pairs in the stack, to get decals that are on top of other decals, like travel stickers on a suitcase.

You can even stack Alpha layers on Alpha layers, to get decals that have been partially scraped off.

The effect of stacked Alpha layers, showing as a damaged decal. I got the effect here by using an extra Alpha layer and the Dented Procedural, with a Frequency of 0.56 in the Color Channel, as shown above.

In the Diffuse and Transparency Channels, I used the same layer, but with a frequency of 0.7, to tighten the mask, and allow the white to show, simulating the color scrapped off the decal, but not the whole thing gone.

The other channels I left untouched, because I wanted the highlight, reflection, etc. to remain damped. The glass isn't likely to be clean and bright where the decal is gone, after all.

The possibilities are endless. Now go out, and play with it, and remember to have fun!

If you have a question, write to me and ask it!

If this tutorial has come lose from the frame it's supposed to be in, or is in someone else's frame, just click here to fix that. (You may need to select the Applying Decals tutorial after clicking.)

Everything on this site is copyright © Robin Wood; all rights reserved. Please do not use anything without permission. To get permission, write to Robin, and explain what you intend to use it for.