LightWave has very powerful (and fast) rendering capabilities; but they aren't exactly intuitive to set up. If you've been playing around in Modeler, or if you've downloaded a model from the web, or found something that looks interesting in the Content folder that comes with LightWave, and you just want to make a render of the fool thing so you can see what it really looks like, but can't figure out how to do that, this Tutorial is for you.
First, let me assure you that you aren't alone. As I said, it's not as simple here as it is in some other programs; but that's because of the flexibility and power of the software. Everything you're expecting, and more, is there. You just need to know how to find it.
What we're going to do here is one very simple method of making a single frame render. As you'll learn, there are many ways to do nearly everything that can be done in LightWave. This is the quickest method I've found that gives consistently good results for people who are very unfamiliar with the program; but that's all it is.
As you move through this tutorial, if you find that the image doesn't show enough for you, try clicking on it. Many of them are linked to full-screen images, which will open in a new window.
Shall we begin? Open LightWave (layout) if it's not already open. If you're using the default settings, you'll see a single window, or viewport. The first thing we're going to do is change that.
So tap the d key, or choose Edit > Display Options... from the top of the toolbar on the left. That will open the Display Options tab of the Preferences panel.
At the top of the panel, you'll see a heading for Viewport Layout. If you are using the default, it'll be set to 'Single'. We need to be able to see what the camera sees, and also to use at least one Orthogonal viewport. So click on the button to open the drop-down menu, and choose a Layout that shows at least 2 viewports, in whatever orientation you find most comfortable. I prefer 2 Left, 1 Right, so that's what I'll be using.
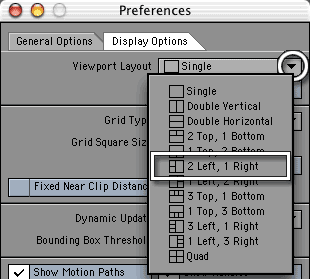
Below that is the Grid section, which we're going to skip for now, followed by a section with Dynamic Update and Bounding Box Threshold fields. Bounding Box Threshold is the maximum number of polygons that the display will show in motion, before it begins to draw everything as a simple wireframe Bounding Box.
The lower this number, the faster and more fluid the motion on the screen; but since the motion will be composed entirely of bounding boxes, that might not be desirable. The higher the number, the more stuff you can have before you see a bounding box, but the slower and jerkier the movement will become. Like everything else, it's a tradeoff. If you have a fast new machine, you might want to set it to 100000 or more. On my 5 year old machine, I have it set at 50000.
Type at least 10000 into the field, and tap the Enter, Tab, or Return key to make it "take." (This is one thing you'll want to get in the habit of. If you don't tap Enter, Tab, or Return, LightWave will often just ignore your keystrokes, and revert to the former value when you close the dialog.)

You'll probably want to come back and fine tune this later, but for now, just close this panel.
When you render in LightWave, you will render whatever is in the field of view of the active camera, no matter what you are looking at. So it makes sense to set one of the Viewports to Camera, so we can see what that is.
At the top of each viewport you'll see the Viewport Titlebar. It has a bunch of controls on it, including, at the far left, the name of the current view. Make sure that one of your viewports says, Camera View. If it doesn't, you can either choose it from the drop down menu under the name, or put the cursor in the viewport and tap 6 on either your keyboard or numeric keypad to change it.
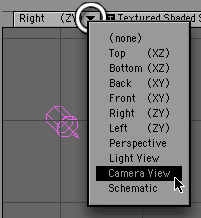
Everything between the colored bars will be in your image when it's rendered. Anything that's behind the color won't. (Your color may be different from mine; it's one of the many things you can change in the Display Options panel.)
Okay! We're all set up. Let's get something in here so we can render it!
Tap the + key (or go to Items > Load: Object). That will open your normal system browser. Find the model you want to render, and Open it to load it into the scene.
As it appears, you will notice that the default camera and light have moved, and the Grid size (in the lower left corner) might be different as well. This is because LightWave automatically adjusts to accommodate the size of the largest object loaded into the scene. If you don't want this to happen, all you have to do is move the camera a tiny bit, and confirm the grid (View > Grid: Grid Size and type the number back into the box.) But, for now, these values are fine. So we'll just leave it like this.
You will also notice that, if you are using the default setup, there are little arrows coming out of your object. These are the handles that allow you to Move it, and are color-coded for the axes, so you don't lose track of where you are. The green one is for the Y axis, the red for the X, and the blue for the Z. (Please don't move it, though, because I want to show you something later.)
Tap the spacebar, and you'll see those handles change. Now they are circles, which allow you to Rotate your object. Click on the Red one, which controls the Heading, and drag to rotate your object if it's not facing the direction you want it to face. (The next tap lets you Scale your object, and the next one lets you Stretch it. But we're not going into that in this tutorial.)
Now, we could just render it as it stands. But it would be dark, and pretty hard to see. So let's add some lights.
We're going to use a three light setup, which is the simplest one that'll give us halfway decent results. We're also going to use the simplest lights, so we don't have to worry about the area each light covers. And that means we're using Distant Lights.
Go to the Items tab, to Add: Lights and choose Distant Light from the menu.
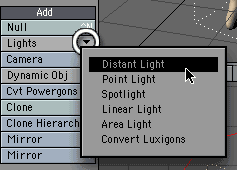
A requester will appear that allows you to name the new light. Call it Fill.

Do it again, but this time, call the new light Back.
Yeah, I know it looks way too bright. But that's because both new lights are pointing in exactly the same direction, right down the Z axis. We'll fix that soon. But first, let's move them away from the origin (where all three axes meet, and where things appear when you add them.)
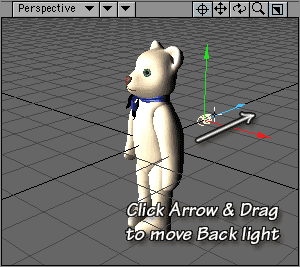
You should see the handles for the Back light. Click anywhere on the blue handle, and drag the light out behind the object. Dragging a handle constrains the motion to that axis only. (If you are working in a Perspective view, and you can't quite see it, hold down Option/alt and drag in the viewport to rotate around the origin, so you can.)
At the bottom of the window, you should see what's called the Current Item area. It tells you what type of thing you are working with (Objects, Bones, Lights, or Cameras) and which one of that type is actually selected. Because we just added those lights, the most recent one, Back, was selected. We need to select the next one, Fill, so we can move it. So click on the Item drop-down, and choose it from the list. (Or use the up arrow on your keyboard to scroll through the lights, and stop at Fill.)

Look at a Top viewport (if you don't already have one, put the cursor in one and tap 2, or choose from the Titlebar menu,) and I'll show you a trick. Hold down your right mouse button (Command+button on a Mac with a one-button mouse) and drag to your right and down. You'll see the light move in that direction, even though you aren't touching it. It's magic! Well, okay, no. It's just the way the program works. You can move any selected object in the two directions shown in the title of the Orthogonal viewports this way.
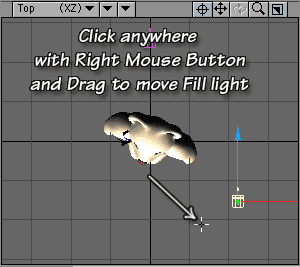
The lights still need to point at the object, though. We could set them all up individually, but that's tedious. Let's do it the easy way.
Add a null to your scene by tapping Control+N (or clicking Items > Add: Null) Call it LightAim in the Null Object Name requester that appears.

If you look at the Current Item area now, you'll see that the Objects button is highlighted. That's because Nulls are objects. Click on the Lights button, or tap Shift+L, so we can work with the Lights again. Tap m (or go to Setup > Motions: Motion Options) to open the Motion Options panel. Notice that the name of the object is at the top of the panel.
We want the light to be aimed at the LightAim null, which means that we want that null to be the light's Target Item. If you click on the Target Item drop-down, which is third from the top in that panel, you'll open a list. Choose LightAim from the list.
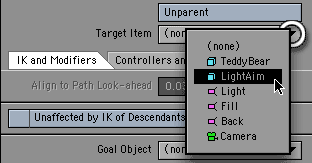
The light instantly swivels to face that null, and a dotted line appears to show that it's connected to a target.
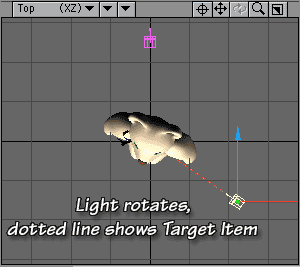
Without closing the panel, choose Light from the Current Item list at the bottom of the main window. (Or use the up arrow key.) The name at the top of the Panel changes, to show that you're working with a different Item.

Pick LightAim for the Light Target Item too. The same thing happens. Click on the Back light (if you can see it in a viewport) to select it, then make LightAim its Target Item as well. Close the panel.
Move a light now (tap t, or go to Modify > Translate:Move to get the Move tool,) and you'll see that it still points at that null. This makes it easy to adjust the lights, so go ahead and do that now.
If you'd prefer to have them all pointing at a different spot, for instance the head of the teddy bear, not his belly, just select the null using the Current Item area (Click Objects, then choose LightAim from the Item list) or the keyboard shortcuts (Shift+O and up arrow.) Get the Move tool again, then move the null. All the lights will rotate to follow it.
That's looking better, but all these lights are pure white, which makes the picture a little flat and uninteresting. Let's go to the Next Page, and we'll fix that.